The beauty of Kubernetes is that applications developed, tested, and run on-premises can be moved to other Kubernetes environments without major refactoring. Of course, if you use a specific load balancer or storage type that isn’t available in GKE, you will need to adjust those settings.
In the next section, we will learn what Artifact Registry is, its features, and how it can make our life easier.
Artifact Registry is a new product from Google Cloud that inherited features from Google Container Registry (GCR) and got some new features.
A container registry is a product that stores and manages Docker images and performs vulnerability analysis with fine-grained access control. You could easily integrate your CI/CD pipelines with it and store the images securely in a private repository.
Artifact Registry goes beyond GCR. Not only does it have the features of a container registry but also many others:
- Artifact storage from Google Cloud Build
- Artifact deployment to Google Cloud runtimes such as GKE, Cloud Run, Compute Engine, and App Engine flexible environments
- Software Delivery Shield offers end-to-end software supply chain security solutions
We have learned where we can store Docker images, so now it is time to deploy a sample application into our Google Kubernetes cluster.
We will guide you through a sample application deployment from the Google Cloud samples Docker repository. The Artifact Registry URL is the URL that you use to access Artifact Registry repositories. The URL is of the following form: https://<REGION>-docker.pkg.dev/<PROJECT_ID>/<REPOSITORY_NAME>
For example, the Artifact Registry URL for the my-repository repository in the my-project project in the us-central1 region would be this: https://us-central1-docker.pkg.dev/my-project/my-repository.
You can use the Artifact Registry URL to push and pull images from Artifact Registry repositories. You can also use the URL to browse the contents of a repository.
We will run the hello-app Docker image from the us-docker.pkg.dev/google-samples/containers/gke/hello-app:1.0 repository.
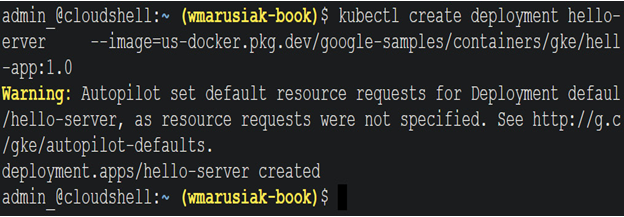
To run this application, we can use the following command:
kubectl create deployment hello-server –image=us-docker.pkg.dev/google-samples/containers/gke/hello-app:1.0
In the next screenshot, we can see the output of the previous command:

Figure 5.30 – hello-app application deployed to GKE Autopilot cluster
The application is deployed, and to use it, we need to expose it to the internet so that we can access it. We can do this by using the following command:
kubectl expose deployment hello-server –type LoadBalancer –port 80 –target-port 8080
We can check running Pods by using this command:
kubectl get pods
After running the command, we receive information about running Pods and their name, status, and age:

Figure 5.31 – Pods running in the hello-app application
The last step is to find out the publicly accessible IP address of our application. To find this out, we should run the following command:
kubectl get service hello-server
In the next screenshot, we can see the output of the command with an external IP address that can be used to access the application:

Figure 5.32 – Publicly available IP address of the hello-app application
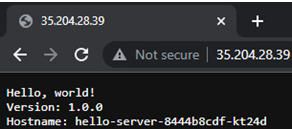
The last step to access the hello-app application is to insert an external IP address into the browser:

Figure 5.33 – hello-app application exposed on the internet
After confirmation that the hello-app application works as expected, the final step is to delete it. To do so, we can use the following command:
kubectl delete service hello-server && kubectl delete deployment hello-server
After deleting the hello-app application with all its services, let’s focus on the different types of deployments we can use.
This is one of the easiest deployment types for an application, and it is mainly used for stateless applications or when we need a single Pod.
A ReplicaSet deployment type is used when we want multiple instances of a Pod with a specified number of running Pods.
A StatefulSets deployment type is similar to Deployment because it uses a single image for Pods. StatefulSets, however, guarantees that when the application is scaled and when we add more Pods, each pod will be unique and have a unique identifier.
Similar to other deployment types, Daemons manage a group of replicated Pods. A DaemonSet is mainly used for application deployment with ongoing background tasks that must be run on certain nodes.
To learn more and get sample deployment types, we recommend visiting the Kubernetes website for a more detailed overview: https://kubernetes.io/docs/concepts/workloads/controllers/.
The first chapter about GKE focused on the architecture, the main components, and how they work with each other. We learned about different types of GKE offerings in Google Cloud—GKE Standard and GKE Autopilot. Another important part of the chapter was about storage in GKE, which is very important to secure our data stored in Pods. An important lesson in this chapter was about the deployment of the two types of GKE clusters themselves and application deployment.
After learning which deployment types GKE and Kubernetes offer, we will learn how to view and manage GKE resources—clusters, node pools, Pods, and services in the next chapter.
