Monitor and report spend
While Azure Advisor and its cost recommendations provide one method for monitoring spend and unused resources, Azure has many other tools that can help you monitor the cost of your resources and report on that cost.
There are several considerations that you must account for when reporting on the cost associated with your Azure resources:
- Azure services are available to customers in over 140 countries worldwide.
- Billing is supported across over 20 major currencies.
- Azure subscriptions are billed monthly. If you are paying by credit card, note that prepaid cards and virtual credit cards are not accepted.
- You can also pay for Azure by monthly invoice. To apply for invoice payment, raise an appropriate billing support ticket from the Azure management portal. Processing the request takes five to seven days, depending on the time required for the necessary credit checks. Invoice payment is only available to business customers, and once a sub- scription has been moved to invoice payment, it cannot be moved back to credit card payment. If you choose invoice payment, you will get an invoice, and you will pay with a wire transfer or check.
- Customers on an Enterprise Agreement (EA) can add up-front commitments to Azure and then create multiple subscriptions under the agreement, which draw from the monetary commitment.
- EA commitments are billed immediately, and then consumed throughout the year against the Azure resources consumed.
- If the committed spend is exceeded, the extra spend, or “overage,” is billed at the same discounted EA rate. Billing for overage is annual if the overspend is under 50 percent of the commitment, or quarterly if over 50 percent.
- Azure Marketplace third-party services are billed separately with a potentially different billing period, separate invoice, and separate credit card charge. Each service has its own billing model, which will be described in the Azure portal at the time of purchase. These range from pay-as-you-go per-minute billing to fixed monthly charges. Some services also offer a “bring your own license” model, which must provide a license purchased separately prior to using the service.
There are three portals that are used to manage Azure subscriptions that are relevant for billing and cost management:
- The EA portal at https://ea.azure.com. This is available only to customers with an Enter- prise Agreement and is used for managing spend across one or more subscriptions.
- The Azure portal at https://portal.azure.com. This is available for all subscriptions and includes Azure Cost Management.
- The Azure Sponsorships portal at https://www.microsoftazuresponsorships.com. This is available only to those who have a sponsorship subscription from Microsoft.
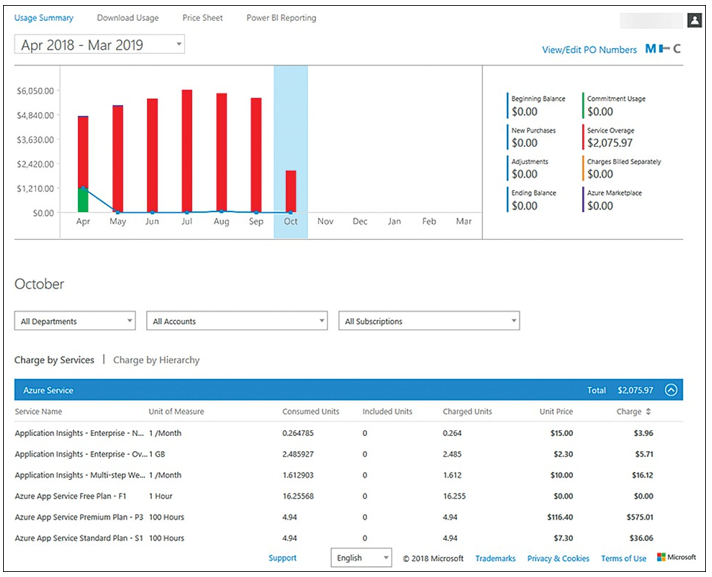
The EA portal can be used to monitor spend across multiple subscriptions with the ability to view costs by the entire organization or by the business unit. Organizations can view historical spending, broken out by commitment, and overage or third-party Azure Marketplace con- sumption (see Figure 1-60). They can also download their current price sheet to see their EA discount rates, which often differ from the public pricing shown in the Azure portal and in the pricing calculator.

FIGURE 1-60 Azure EA portal usage summary
EA customers can create spending quotas and set notification thresholds through the EA portal. This is in addition to the budget alerts available through the Cost Management and Bill- ing tools of your Azure subscription. An advantage of using the EA portal to configure spend- ing notifications is that a quota alert can be triggered based on aggregate spending across all the subscriptions within a department. Cost centers can be assigned to the departments that accounts and subscriptions roll up to for EA customers, making it easier to track cost by busi- ness unit and operate a showback or chargeback model.
Within the Azure portal, EA customers can also use Azure Cost Management for track- ing cost for individual subscriptions. Cost Management includes features for performing cost analysis, setting per-subscription budgets and alerts, setting recommendations for optimiza- tion, and exporting cost management data to perform deeper analysis.
Access to the Cost Management service is dictated by scopes and might vary depend- ing on the type of agreement or subscription that you have with Microsoft. A user must have at least read access to one of the following scopes shown in Table 1-5 to view data in Cost Management.
TABLE 1-5 Cost Management access scopes
| Scope | Defined at | Required access to view data | Prerequisite EA setting | Consolidates data to |
| Billing account | https://ea.azure.com | Enterprise Admin | None | All subscriptions from the enterprise agreement |
| Department | https://ea.azure.com | Department Admin | DA view charges enabled | All subscriptions belonging to an enrollment account that is linked to the department |
| Enrollment account | https://ea.azure.com | Account Owner | AO view charges enabled | All subscriptions from the enrollment account |
| Management group | https://portal.azure.com | Cost Management Reader (or Reader) | AO view charges enabled | All subscriptions below the management group |
| Subscription | https://portal.azure.com | Cost Management Reader (or Reader) | AO view charges enabled | All resources/ resource groups in the subscription |
| Resource group | https://portal.azure.com | Cost Management Reader (or Reader) | AO view charges enabled | All resources in the resource group |
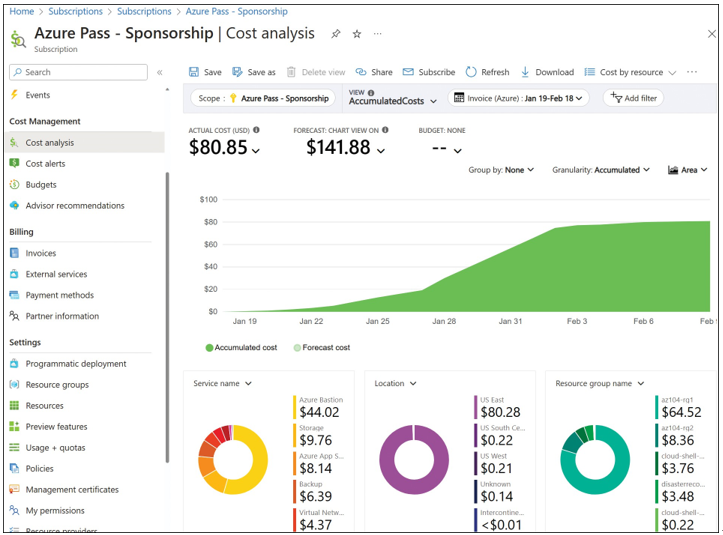
To access Cost Management in the Azure portal, browse to Cost Management + Billing and choose Cost Management. Finally, select Cost Analysis, as shown in Figure 1-61.
If you have access to more than one scope, you can filter by scope and begin interacting with the data. From the Cost Analysis blade, you can view the total costs for the current month, view the budget (if available), set the granularity (Accumulated, Daily, or Monthly), and apply the filters. You can filter by Location, Meter, Meter Category, Meter Subcategory, Resource, Resource Group Name, Resource Type, Service Name, Service Tier, Subscription ID, Subscrip- tion Name, and Tag.
The data in a view can be downloaded from the Cost Analysis blade as a CSV file. Any filtering that you have applied, including groupings, are applied to the file.

