Pods go through a specific sequence of stages throughout their lifecycle. It begins with the Pending phase, progresses to the Running phase if at least one of its primary containers starts successfully, and ultimately transitions to either the Succeeded or Failed phase based on whether any container within the Pod terminates with a failure.
Pods can have the following statuses:
- Pending—The Kubernetes cluster has accepted the Pod but is not ready to be run yet. For example, an image is being downloaded.
- Running—The Pod is bound to a node, and all containers have been created.
- Succeeded—All containers in the Pod have been successfully terminated.
- Failed—All containers in the Pod have terminated, and at least one has terminated in failure.
- Unknown—The status of the Pod cannot be obtained.
There are many ways in which Pods can be deployed. It depends on how the application is built and how we want to run it in Kubernetes.
Here are some of the most common methods:
- Using the kubectl command-line tool—This is the most common way to deploy Pods. You can use the kubectl create command to create a new Pod or the kubectl apply command to apply a YAML file that defines a Pod.
- Using the Kubernetes Dashboard—The Kubernetes Dashboard is a graphical user interface that you can use to deploy Pods. You can create new Pods or edit existing Pods from the dashboard.
- Using a third-party tool—There are a number of third-party tools that you can use to deploy Pods. These tools typically make it easier to deploy Pods, and they often provide additional features, such as automatic scaling and monitoring.
Here are some of the most popular third-party tools for deploying Pods:
- Helm—Helm is a package manager for Kubernetes. It makes it easy to deploy and manage complex applications on Kubernetes.
- Argo CD—Argo CD is a continuous delivery (CD) tool for Kubernetes. It can be used to automate the deployment of Pods, as well as the rollout of new versions of Pods.
- Flux—Flux is a CD tool for Kubernetes. It is similar to Argo CD, but it is designed to be more lightweight and easy to use.
Pod creation
The simplest Pod creation can be done by applying the following code example, where we name the Pod nginx-deployment and we use an image of nginx 1.14.2 on port 80:
apiVersion: apps/v1
kind: Deployment
metadata:
name: nginx-deployment
spec:
selector:
matchLabels:
app: nginx
replicas: 2
template:
metadata:
labels:
app: nginx
spec:
containers:
– name: nginx
image: nginx:1.14.2
ports:
– containerPort: 80
We can also deploy this simple Pod by using the CLI. We saved the previous code into the nginx.yaml file:
kubectl apply -f nginx.yaml
This is the output after executing the command:

Figure 6.24 – Successful deployment of nginx deployment
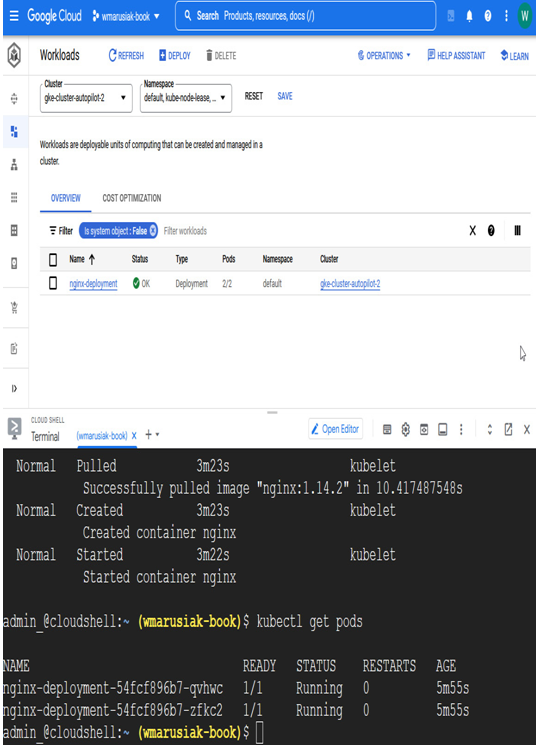
We can check the status of the Pod by using the kubectl get pods or kubectl describe pod nginx command from the CLI. The status of the Pod is also visible in Cloud console:

Figure 6.25 – Successful deployment of nginx deployment (continued)
Basic information about the Pods is displayed in both cases—Cloud Shell and the CLI.
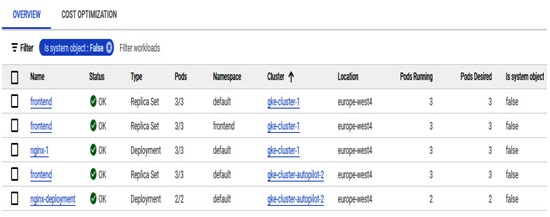
In the next screenshot, we deployed multiple Pods into different GKE clusters and namespaces with the same Pod name:

Figure 6.26 – Workloads overview in Cloud console
We will now move to more advanced Pod deployment types such as ReplicaSet, StatefulSets, and others.
