Imagine setting up a Google Cloud Storage bucket for storing a copy of your backup data of the on-premises systems located in your data center in Frankfurt. You want your bucket to be the closest to your data center location and be available even if one of the Google regions fails. You expect the data will be accessed less than once a month, and you want to adjust the storage class to minimize costs. Also, the bucket can’t be accessed from the internet. Furthermore, you might want to protect backups against malicious deletion and make sure no one deletes them for the next 5 years. Let’s look at the possible steps you need to take to configure such a bucket:
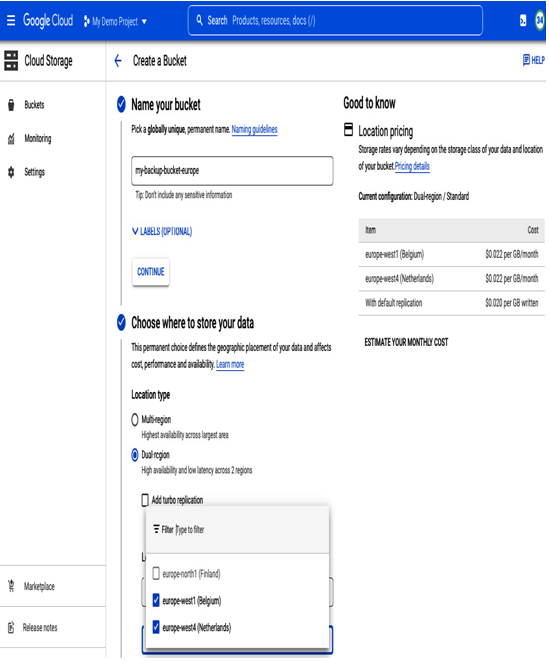
- In the Cloud Storage section, select Bucket and then +CREATE. Provide a bucket name, which must be unique globally across all Google Cloud projects. You should use a globally unique name that relates to the bucket’s purpose, such as my-backup-bucket-europe
- The next step is to decide where the backups should be stored. In this case, the requirement is for the bucket to be accessible even in the case of a region failure, so we can’t select a regional bucket. On the other hand, we want to ensure minimal latency, so we also can’t select a multi-regional option. In the multi-regional option, Google will decide where data is stored within a selected continent and possibly select one of the regions that are further compared to others. This choice can potentially introduce additional latency. For our needs, the best choice is dual-region placement. This allows us to select two regions that we want to use. In this case, we should keep data within the geographical area of Europe and select regions closest to our on-premises location. Moreover, in the case of a failure in one region, the second one will serve the content. As of writing this book, possible options in the bucket configuration page (see Figure 8.17) are Finland, Belgium, and Netherlands, with Belgium and Netherlands being closest to Frankfurt:

Figure 8.17 – Creating a bucket; selecting location type
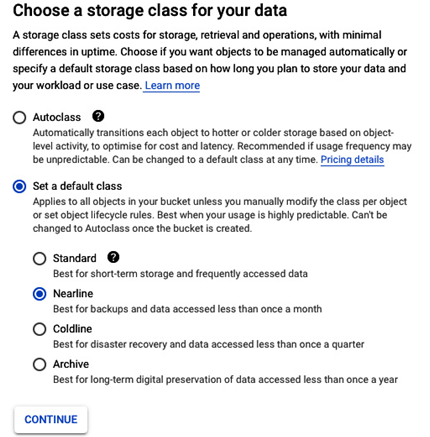
- Next, you can select the storage class based on planned data usage or use Autoclass. In our case, we will store backup copies that won’t be frequently accessed. Therefore, Nearline is the optimal option as it is tailored for accessing data less than once a month. Also, it is good practice to verify with the backup vendor whether they support a storage class we want to use. For example, backup software may consolidate backups as a background task and read from a bucket more often than we think, and that will generate additional costs:

Figure 8.18 – Creating a bucket; available storage classes
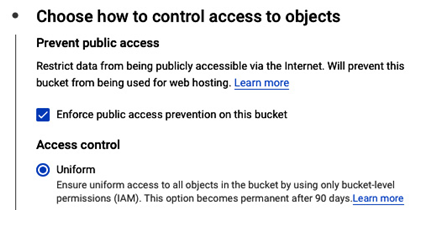
- One of the requirements is to make sure backup files are not accessible from the internet. We can control it by selecting Enforce public access prevention on this bucket, ensuring no one can make those backup files public:

Figure 8.19 – Creating a bucket; access control
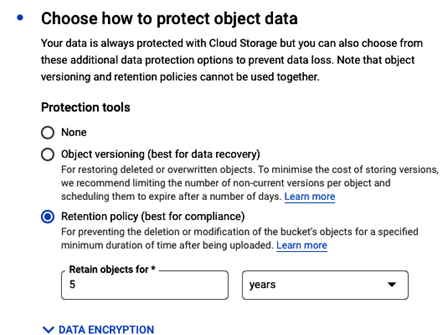
- The last requirement was to ensure that no one would delete backup files in five years. This can be configured by setting Retention policy to retain objects for five years. Please note that in real-life situations, depending on the backup solution vendor, the protection tools may have limited support:

Figure 8.20 – Creating a bucket; retention policy
- As a last step, we can also choose whether the files will be encrypted using the Google-managed encryption key or the customer-managed encryption key (CMEK). By utilizing CMEK, you gain greater control over various aspects of your key management and lifecycle such as using different types of keys (software or hardware-backed keys) and using keys managed externally.
- To proceed with the setup, we need to hit CREATE. The bucket will be available in a few moments.
By following those steps, we created a Google Cloud Storage bucket that complies with our example task’s requirements, and this way, we reviewed the most important features of Google Cloud Storage buckets.
Now that we have learned how the object store works, let’s explore alternative ways to store data in Google Cloud.
