Configure Azure Disk Encryption
The disks of an Azure virtual machine are always encrypted. However, you have the option to configure how the disks are encrypted. By default, disks use platform-managed encryption, meaning that Microsoft manages the encryption key and key rotation for the disk. If you have a business or technical requirement to manage your own encryption keys, you can integrate the encryption with Azure Key Vault. In this section, you will learn how to manage Azure Disk Encryption with a few scenarios using the Azure portal. Please note that these steps can be performed using PowerShell or Azure CLI.

Enable encryption on an existing VM
Follow these steps to enable encryption on an existing VM:
- Browse to the VM resource in the Azure portal and under Settings, select Disks (see Figure 3-17).
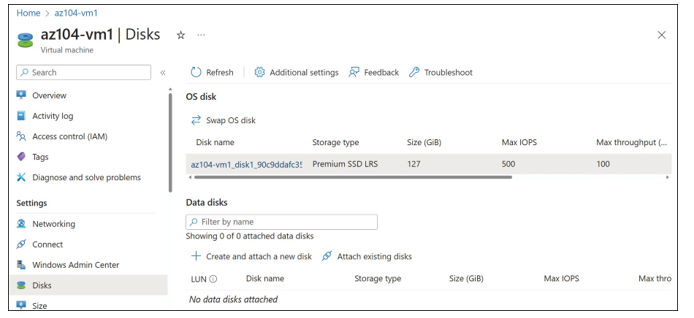
FIGURE 3-17 Disks blade for an Azure VM
- In the Command bar, click Additional Settings. Then, click Encryption. Under Disks To Encrypt, choose None, OS Disk, or OS And Data Disks, as shown in Figure 3-18. Select either OS Disk or OS And Data Disks to be prompted for the Azure Key Vault.
- When you select the disks to encrypt, options for Azure Key Vault appear. Select the key vault where you have created a key to be used for Azure Disk Encryption. If you do not have a key vault or key, you can also create them directly from this page, as shown in Figure 3-19.
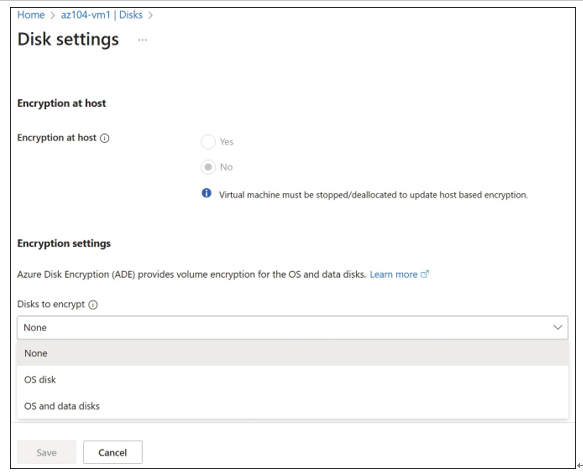
FIGURE 3-18 Encryption options for Azure VM disks
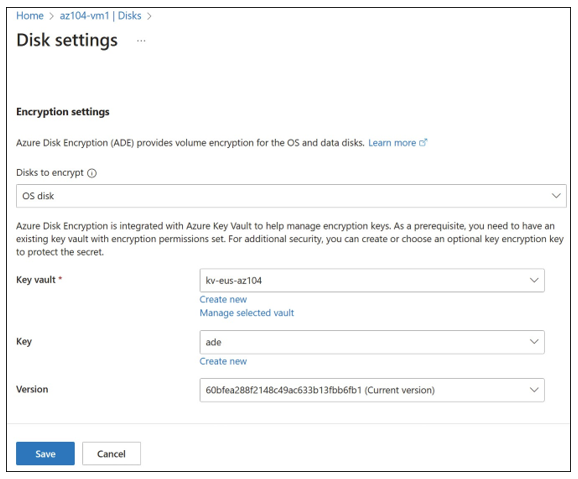
FIGURE 3-19 Encryption options for Azure VM disks
- Click Save.
- Click Review + Create. After the key vault has passed validation, click Create. This will return you to the Select Key From Azure Key Vault blade.
Disable encryption
To disable encryption for operating system and data disks for an existing VM, select None from the Disks To Encrypt menu, as shown in Figure 3-20.
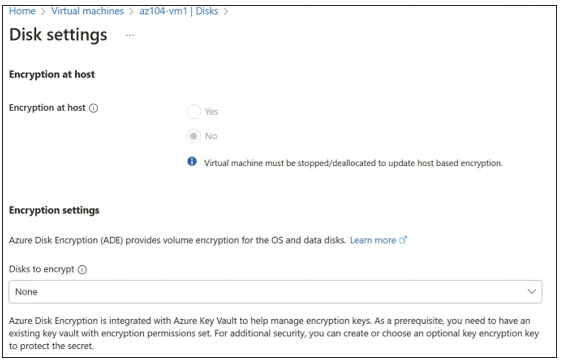
FIGURE 3-20 Disable disk encryption
Move VMs from one resource group or subscription to another
Azure provides the ability to move some resources from one subscription to another or from resource group to resource group. You could choose to do this for ongoing governance, mergers and acquisitions, changing in billing chargebacks, or other reasons. Depending on the resource type, you might be able to move a single resource. For some resources, such as a virtual machine, you need to move the related resources, such as the NIC, disk, etc., with the VM. Net new resources are not created in the target resource group or subscription.
Follow these steps to move a resource using the Azure portal:
- From the Azure portal, navigate to the resource group where the resource is located.
- On the Overview blade of the resource group, select the resources you plan to move by selecting the checkmark for the desired resources.
- From the command bar, choose Move, and then select the destination: Move To Another Resource Group, Move To Another Subscription, or Move To Another Region. For this example, select Move To Another Resource Group. Depending on your screen size or resolution, Move might be hidden behind the ellipses, as shown in Figure 3-21.
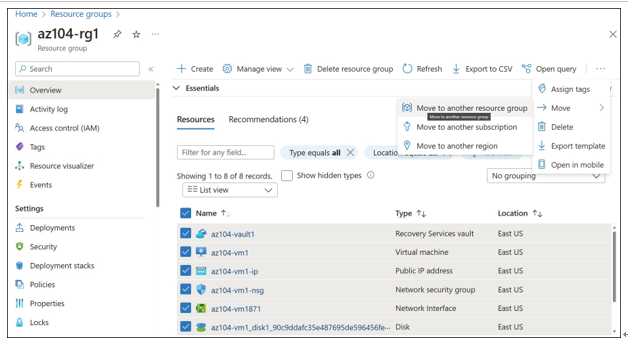
FIGURE 3-21 Resources selected with the Move menu
4. The Move Resources blade opens in the Azure portal. Select the Source + Target tab, and then select the desired target resource group. Figure 3-22 shows az104-rg2 selected as the target.
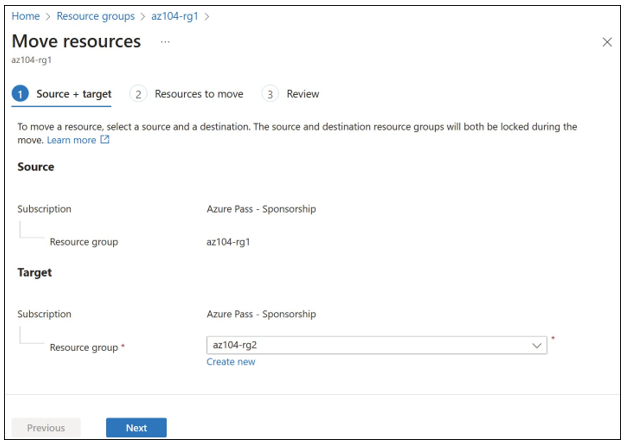
FIGURE 3-22 The Source + Target tab of the Move Resources blade
5. Click Next. On the Resources To Move tab, the portal will validate whether the resources can be moved to the target resource group. Depending on the option you select, this could fail because of quota (if moving to a new subscription), orphaned resources (if you did not select all required resources), or other factors. Figure 3-23 shows a successful validation.
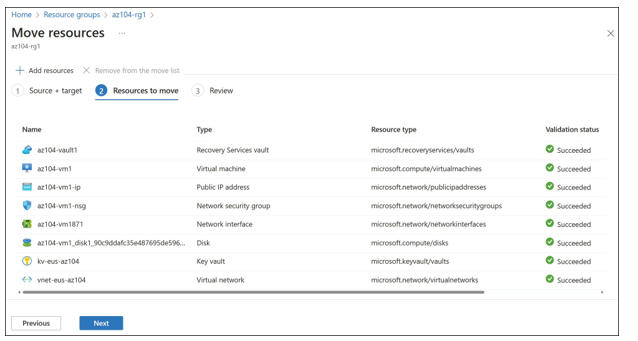
FIGURE 3-23 The Resources To Move tab of the Move Resources blade
- Click Next. Accept the terms, and click Move to start moving the resources, as shown in Figure 3-24.
- Because the resource group will change, any existing scripts that target resources in this resource group will no longer work until they have been updated. The Azure portal prompts you to confirm that you are aware of this change before you can continue with the move.
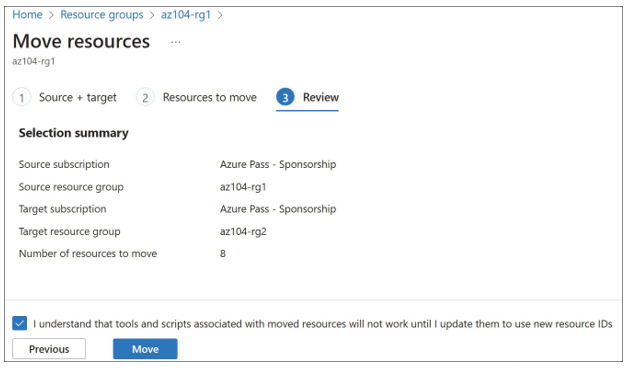
FIGURE 3-24 The Review tab of the Move Resources blade


The process for moving a resource to another subscription or region is similar and progresses through the same steps on the Move Resources blade. However, this could have more impact on the resources than moving resource groups. Changing subscriptions could change the billing associated with the resource. Changing regions could impact the price of the resource, as well as connectivity, as routing or other network changes might also need to be made.
