From now on, we’ll be using the original interface.
Let’s briefly look at every section on the profile editor page:
- Profile Detail: This section contains the main details of the profile, including whether it is a standard profile or a custom one. This section is editable on custom profiles only.
A custom profile is a profile that’s created upon cloning a standard profile.
- Console Settings: Edit layout assignment in Salesforce console apps.
- Page Layouts: This section is used to assign layouts to records (and record types if the object has at least one record type).
- Field-Level Security: For each object, this defines which fields are visible and editable.
- Custom App Settings: This decides which Salesforce applications are accessible by the user and which ones are the default ones.
- Tab Settings: Like the Custom App Settings section, we can choose which tabs are enabled or hidden.Record Type Settings: For any object that supports record types, you can allow users to use them when creating a new record, thus allowing users to have access to specific business processes.
- Administrative permissions and General User Permissions: This section contains all the administrative settings and general permissions (such as the View All Data and Modify All Data superpowers). This section can only be edited for custom profiles.
- Standard Object Permissions, Custom Object Permissions, and Platform Event Permissions: These sections define the OLS, that is, CRUD operations and the View All and Modify All superpowers, which allow the user to view and modify all the records of a given type. Platform events can only be configured with read or create access.
- Session Settings and Password Policies: These sections display profile-specific session settings (such as session duration and security level) and everything about password management that overrides the Setup | Security | Session Settings and Password Policies org-wide settings.
- Login Hours: Define when a user should be able to log in to Salesforce.
- Login IP Ranges: Defined the origin IP addresses that are considered safe to access your Salesforce organization (there’s a restriction on a company’s IP ranges). Within this range of IPs, users won’t be asked for an activation pin (this is sent via email or SMS). You can also restrict this to org-wide login so that it’s executed from within this range in Setup | Security | Session Settings.
- Enabled Apex Classes Access and Enabled Visualforce Page Access: From here, you can enable access to Apex classes (for example, enable a user to access a specific custom Apex web service) and Visualforce pages (for example, access to a specific Visualforce wizard).
- Other permissions:
- External Data Source Access: Access to external records (defined in Setup | Integrations | External Data Sources).
- Named Credential Access: Access to specific external web servers (Setup | Security | Named Credentials).
- Service Presence status: Available presence statuses (for example, live chat operator status such as Active, Away, or Offline. Go to Setup | Features Settings | Service | Omni-Channel | Presence Statuses to do this. Note that you need Omni-Channel activation).
- Custom Permissions: Allows profiles to have custom permissions that have been designed to modify a Visualforce or Lightning component’s behavior on the developer side and validation rules on the administrator side (Setup | Custom Code | Custom Permissions).
- Default Community: Default Salesforce community (if any).
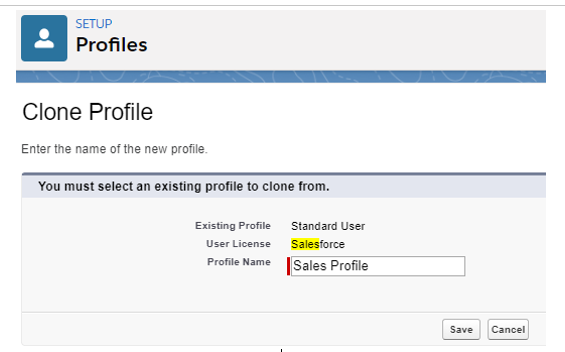
If you want to create a new custom profile, you only have to jump to the standard profile you want to modify (or choose another custom profile that’s already set up) and click the Clone button, which brings you to the following page:

Cloning a standard profile
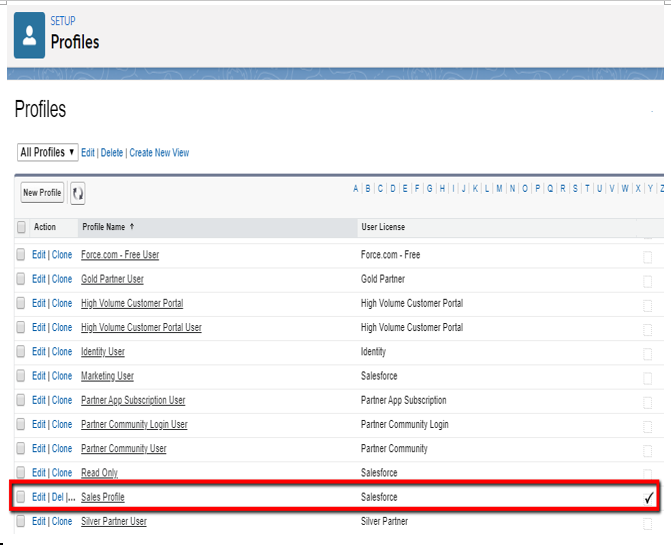
From now on, the profile will be completely customizable and will be listed as a custom profile on the profile’s Setup | Users | Profiles page:

Custom profiles on the Profiles page
Now, let’s look at how we can create permission sets.
