Handling data changes
So far, we have talked extensively about how to release metadata changes, but what about data changes?
You may need to cleanse some fields on your records (due to a bug or a change request) or import a new table or even delete a given object from your organization because you don’t need it anymore. In the upcoming sections, we will look at how to import and export data. Let’s start with importing data using the Data Import Wizard.
Importing data with the Data Import Wizard
Salesforce provides two basic built-in ways to import data into your organization:
- Data Import Wizard (in-browser wizard)
- Data Loader (external app)
To access the Data Import Wizard, navigate to Setup | Integrations | Data Import Wizard, which brings you to the following page:
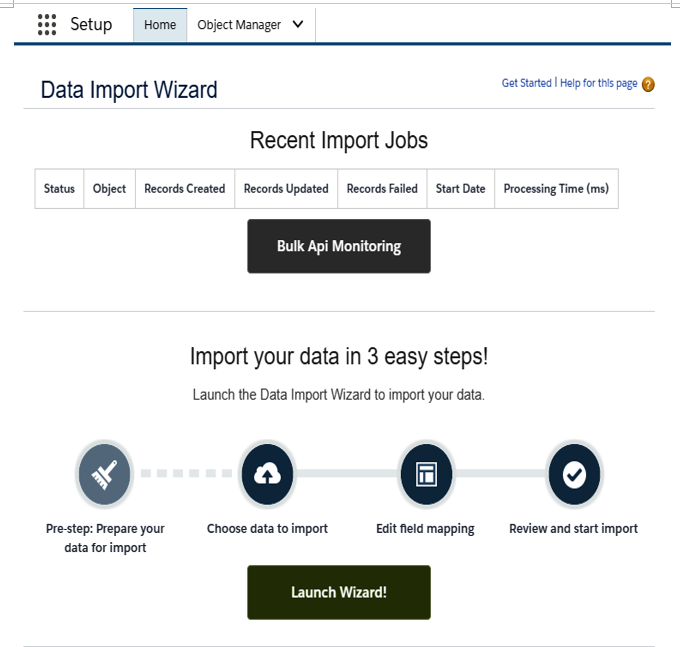
With this tool, you can import up to 50,000 records at a time and easily configure the mapping between the imported file and the objects’ fields on Salesforce.
Before importing anything, you will need to load a file in CSV format (up to 100 MB in size).
You can extract a file in this format from any Salesforce report by specifying CSV as the desired format (Export is one of the available report object actions you can undertake):
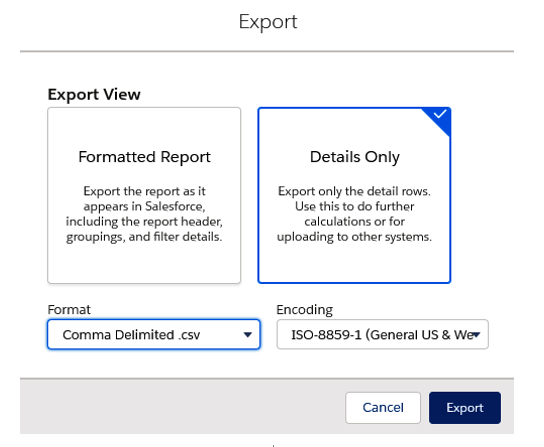
This gives you a file in the following format:
“Account Name”;”Billing State/Province”;”Type”;”Rating”
“Super Gnite Ltd.”;””;”Technology Partner”;”Hot”
“GenePoint”;”CA”;”Customer – Channel”;”Cold”
“United Oil & Gas, UK”;”UK”;”Customer – Direct”;””
The preceding code shows semicolon-separated values enclosed in double quotes. To be compliant with the Data Import Wizard, replace the semicolon with a comma or tab.
You can export data from whatever source you want (for account, contact, and lead records, you can directly export CSV files from the ACT!, Gmail, or Outlook apps). The important thing is that it’s in CSV format.
Before you import anything, you need to clean up your data. Ensure that the necessary header columns are there and that there are some Salesforce field labels that match them so that the import wizard will be able to automatically match the mappings.
If you import a file containing Salesforce IDs for lookup fields, remember that IDs are case-sensitive, which means that if you change the case even for a single character, the IDs won’t be recognized, leading to import errors.
Use a column named Record Owner to match a Salesforce owner for new records, while valuing it by username, first and last name, or Salesforce ID (the import engine automatically matches the user).
Once the CSV file is ready, click on the Launch Wizard! button.
Once the app has been loaded, you’ll be required to select the following:
- One of the available standard objects (accounts, contacts, leads, solutions, or campaign members) or a custom object.
- The kind of action you wish to take place:
- Add new records: The file will contain only new records (and if a match is found, no record will be inserted).
- Update existing records: The file will contain only existing records.
- Add new and update existing records: The file will contain both new and existing data that needs to be updated.
- Match by: This is the field that is used to understand whether a record is new or already exists.
- Which User field in your file designates record owners: Leave this as none if you want new objects to be assigned to you. However, you can even use a Salesforce ID if you want to use the user’s ID, Name if you want to use the user’s first and last name or full username, or External ID if you plan to use some other external ID field for user matching.
- Trigger workflow rules and processes for new and updated records: Select this flag to run automations upon a successful record import.
- Select the CSV file to be imported and click Next.
Before starting the import wizard, you need to select/change the right field mapping:
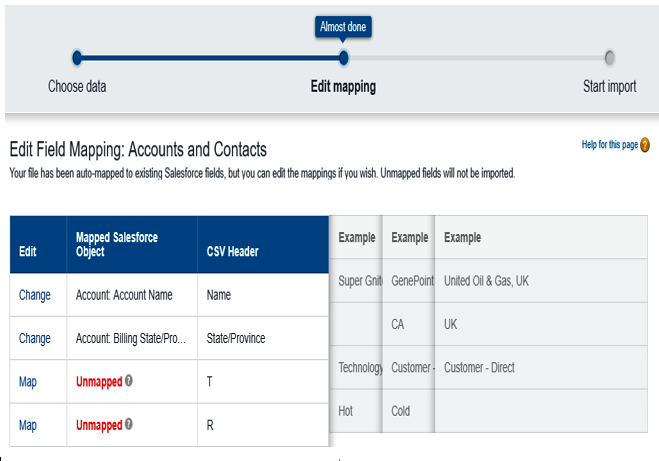
Mapping selection on the Data Import Wizard
Click on Change or Map to set up different mappings than the ones provided by the wizard.
For Accounts and Contacts, you can set up multiple mappings to refer to both objects. Click on Next to review these changes and start the import by clicking on the Start Import button (a quick review of what’s going on is provided here):
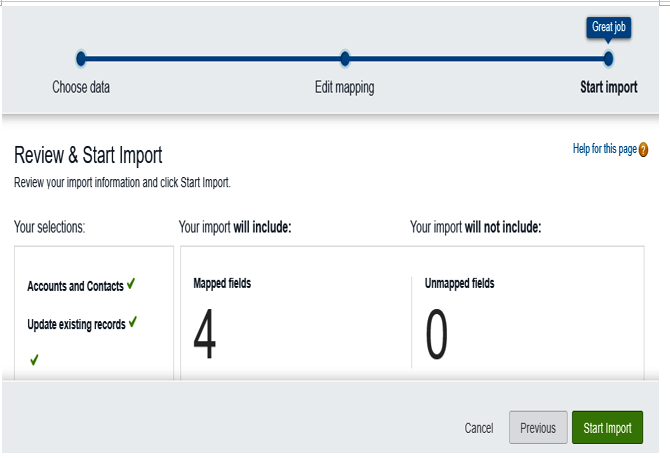
You’ll be notified of job completion by email. In the meantime, you can monitor Bulk API jobs (special kinds of APIs that are used to import big data) by going to Setup | Environments | Jobs | Bulk Data Load Jobs:
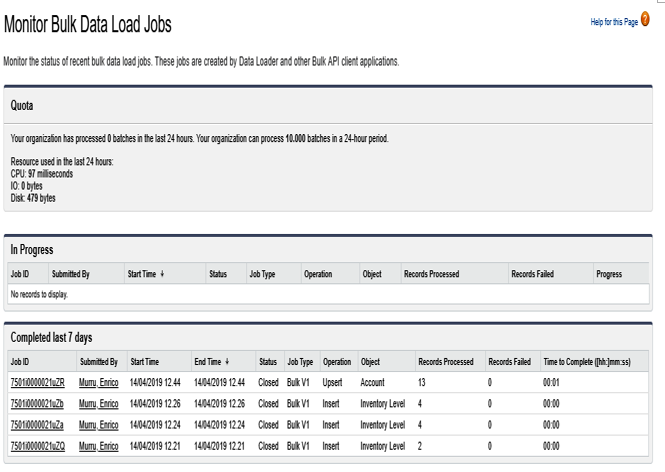
Data Import Wizard job monitoring
Remember that you can only run one import at a time, regardless of the browser or user that triggers it.
