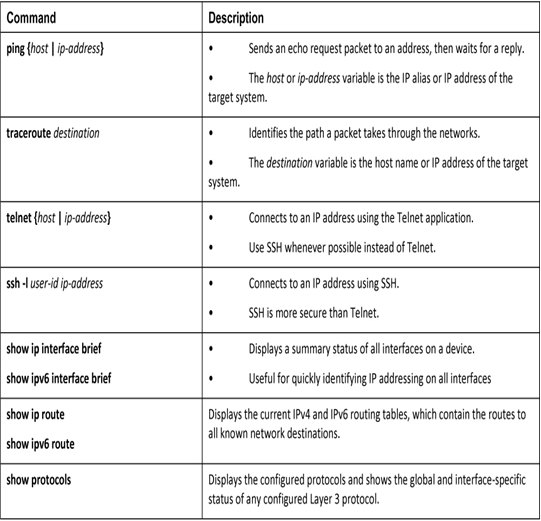
To gather symptoms from a networking device that is suspected to have issues, use Cisco IOS commands (see Table 37-5) and other tools such as packet captures and device logs.

Table 37-5 Cisco IOS Commands for Gathering Information
Analyze the Information (37.3.10)
Now that the trouble ticket has been created and information has been gathered, the technician must analyze the information. To accomplish this, the technician relies on their experience, knowledge bases, and other information sources to decide if they can solve the problem. The technician may also communicate with peers to gain insight on the problem.
Knowledge bases that can be searched include
- Ticketing software databases—Most ticketing systems build a repository of previous tickets that can be searched to see if another technician resolved an identical or similar problem.
- Vendor resources—Vendors maintain Frequently Asked Questions (FAQs) documents that can be searched and may also offer online tools to help resolve problems. Some offer live chats to solve problems faster.
- Online Internet searches—Using search engines to see if a problem has been encountered before.
If the problem cannot be solved, then the ticket must be escalated to a more-experienced IT staff member.
Check Your Understanding—Help Desks (37.3.11)
Refer to the online course to complete this activity.
Troubleshoot Endpoint Connectivity (37.4)
Many support requests begin with a report from the end user. Being able to troubleshoot the endpoints of the network is important in determining the cause and scope of the problem.
Windows Network Setup (37.4.1)
If you have used any of the tools to verify connectivity and found that some part of your network is not working as it should, now is the time to use some commands to troubleshoot your devices. Host and IOS commands can help you determine if the problem is with the IP addressing of your devices, which is a common network problem.
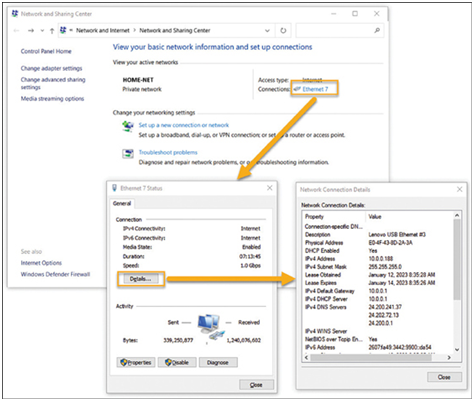
Checking the IP addressing on host devices is a common practice in networking for verifying and troubleshooting end-to-end connectivity. In Windows 10, you can access the IP address details from the Network and Sharing Center > interface > Details. As shown in Figure 37-30, the interface details reveal the host’s IP address, subnet mask, default gateway, and known DNS servers.

Figure 37-30 Viewing the Details of an Ethernet Connection in Windows
The preferred method used by technicians to view the IP addressing information on a Windows host is to use the ipconfig Windows command as shown in Example 37-5.
Example 37-5 Output for the ipconfig Command
C:\Users\PC-A>
ipconfig
Windows IP Configuration
(Output omitted)
Wireless LAN adapter Wi-Fi:
Connection-specific DNS Suffix . :
Link-local IPv6 Address . . . . . : fe80::a4aa:2dd1:ae2d:a75e%16
IPv4 Address. . . . . . . . . . . : 192.168.10.10
Subnet Mask . . . . . . . . . . . : 255.255.255.0
Default Gateway . . . . . . . . . : 192.168.10.1
(Output omitted)
The ipconfig /all command is used to view additional addressing details as shown in Example 37-6.
Example 37-6 Output for the ipconfig /all Command
C:\Users\PC-A>
ipconfig /all
Windows IP Configuration
Host Name . . . . . . . . . . . . : PC-A-00H20
Primary Dns Suffix . . . . . . . : cisco.com
Node Type . . . . . . . . . . . . : Hybrid
IP Routing Enabled. . . . . . . . : No
WINS Proxy Enabled. . . . . . . . : No
DNS Suffix Search List. . . . . . : cisco.com
(Output omitted)
Wireless LAN adapter Wi-Fi:
Connection-specific DNS Suffix . :
Description . . . . . . . . . . . : Intel(R) Dual Band Wireless-AC 8265
Physical Address. . . . . . . . . : F8-94-C2-E4-C5-0A
DHCP Enabled. . . . . . . . . . . : Yes
Autoconfiguration Enabled . . . . : Yes
Link-local IPv6 Address . . . . . : fe80::a4aa:2dd1:ae2d:a75e%16(Preferred)
IPv4 Address. . . . . . . . . . . : 192.168.10.10(Preferred)
Subnet Mask . . . . . . . . . . . : 255.255.255.0
Lease Obtained. . . . . . . . . . : August 17, 2019 1:20:17 PM
Lease Expires . . . . . . . . . . : August 18, 2019 1:20:18 PM
Default Gateway . . . . . . . . . : 192.168.10.1
DHCP Server . . . . . . . . . . . : 192.168.10.1
DHCPv6 IAID . . . . . . . . . . . : 100177090
DHCPv6 Client DUID. . . . . . . . : 00-01-00-01-21-F3-76-75-54-E1-AD-DE-DA-9A
DNS Servers . . . . . . . . . . . : 192.168.10.1
NetBIOS over Tcpip. . . . . . . . : Enabled
Verify Connectivity in Windows (37.4.2) The ping command is an effective way to quickly test Layer 3 connectivity between a source and destination IP address. This command, as shown in Example 37-7, also displays various round-trip time statistics.
Example 37-7 Round-Trip Time Statistics in the ping Command
C:\Users\PC-A>
ping 10.1.1.10
Pinging 10.1.1.10 with 32 bytes of data:
Reply from 10.1.1.10: bytes=32 time=47ms TTL=51
Reply from 10.1.1.10: bytes=32 time=60ms TTL=51
Reply from 10.1.1.10: bytes=32 time=53ms TTL=51
Reply from 10.1.1.10: bytes=32 time=50ms TTL=51
Ping statistics for 10.1.1.10:
Packets: Sent = 4, Received = 4, Lost = 0 (0% loss),
Approximate round trip times in milli-seconds:
Minimum = 47ms, Maximum = 60ms, Average = 52ms
C:\Users\PC-A>
As shown in Example 37-7, the output validates Layer 3 connectivity between PC A and the device with the IPv4 address 10.1.1.10.
The traceroute or Windows tracert commands can help locate Layer 3 problem areas in a network. A trace returns a list of hops as a packet is routed through a network. It could be used to identify the point along the path where the problem can be found.
Some firewalls, such as Windows Firewall, will block pings by default. It is important to include this information as part of your network documentation and to be aware of these settings when testing and verifying network connectivity.
