This is something slightly technical, but it is a safeguard so that only trusted domains can be used from within a community. The Live Agent channel uses a parallel HTTP domain for the chat requests, so we need to explicitly tell Salesforce that this domain is safe to use.
Copy the domain part of the URL from this message (in this example, it is https://d.la1-c2-cdg.salesforceliveagent.com; you can get it from Setup | Live Agent Settings).
We are almost there, so don’t panic. This stuff is more developer-oriented and you won’t need to set it up by yourself in most cases, but it’s important to know all the steps involved in Live Agent snap-in activation.
Click the Settings icon (the gear icon), go to the Security tab, and select the Allow Inline Scripts and Script Access to Whitelisted Third-party Hosts value from the Content Security Policy (CSP) section (click Allow on the confirmation modal). Then, click on the lower + Add Trusted Site button and add the Live Agent domain. This should be our final configuration:
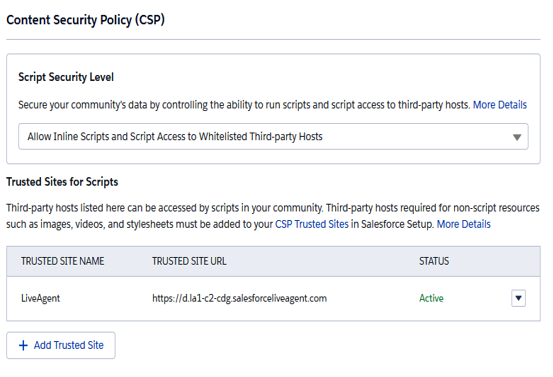
Content Security Policy set up for Live Agent
On the lower part of your template, a new Agent Offline component will appear. Click on it to view its settings:
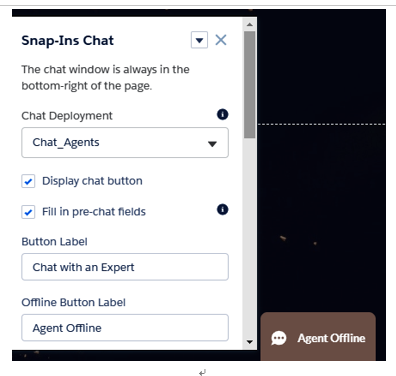
Snap-in component configuration
Click on the Publish button at the top of the builder and wait until you receive an email notification stating that the community has been published. Let’s test it.
Open the community in a new tab and the Service Console app in another one.
On the Service Console app, open the Omni-Channel component and set the presence to Available – Chat (you may see the Available – Case presence status, which won’t trigger the availability of the chat). After a few seconds, the snap-in component on your console should change its label to Chat with an Expert (text labels can be changed from the snap-in component’s configuration settings).
Click on the community component. A form should appear, asking for the customer’s data:
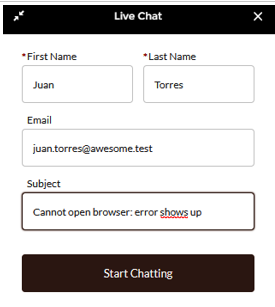
Live Chat’s pre-chat form
This is called the pre-chat form, and it is can be configured from Setup | Embedded Service (formerly Snap-Ins).
Once we click on the Start Chatting button, the magic happens. On the console, the agent is notified about the incoming chat by the Omni-Channel; a new case and contact are automatically created using the pre-chat form, and the chat can flow instantly between the agent and the customer (try it yourself). The system searches for any contact that matches the email address the user entered on the pre-chat form. If no exact match is found, a brand-new contact is created with the details of the pre-chat form.
If you create a new case using the same procedure that we used in the Omni-Channel section (changing case ownership to a high-priority case queue), you’ll see that no case is sent to the agent’s work queue.
This is because the Available – Chat presence status is not related to the case’s configuration. Let’s say that an agent is available to chat; they can handle cases as well (but not the contrary). Go to Setup | Omni-Channel | Presence Statuses and edit the Available – Chat status. From here, add a reference to the Service channel configuration we created for the case work items:
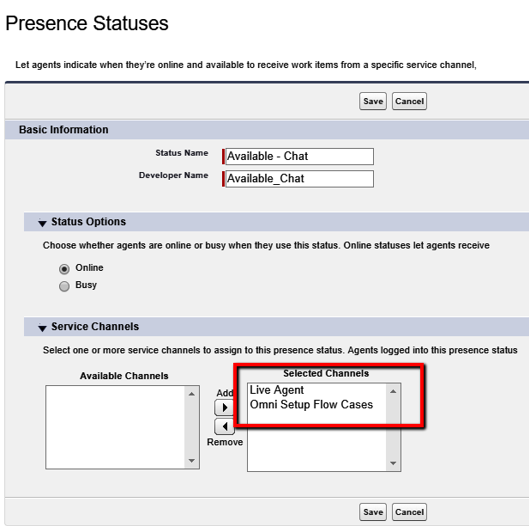
Presence Statuses configuration for two different Service channels
If you have created a new case and successfully managed to handle it with the Omni-Channel component, go to the Omni Supervisor app so that we can monitor the capacity status:
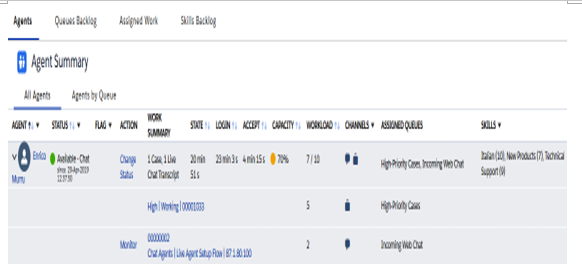
Agent’s capacity during a chat and case management session
For more details about snap-ins, please refer to Salesforce Help at https://help.salesforce.com/articleView?id=snapins_chat_setup.htm&type=5.
