Compare ARM templates and Bicep
ARM templates are built in JSON which make them verbose and tough to read. The following 29-line code block with quotes, brackets, and commas presents an ARM template that deploys a storage account.
{
“$schema”: “https://schema.management.azure.com/schemas/2019-04-01/deploymentTemplate. json#”,
“contentVersion”: “1.0.0.0”, “parameters”: {
“location”: { “type”: “string”,
“defaultValue”: “[resourceGroup().location]”
},
“storageAccountName”: { “type”: “string”,
“defaultValue”: “[format(‘toylaunch{0}’, uniqueString(resourceGroup().id))]”
}
},
“resources”: [
{
“type”: “Microsoft.Storage/storageAccounts”, “apiVersion”: “2021-06-01”,
“name”: “[parameters(‘storageAccountName’)]”, “location”: “[parameters(‘location’)]”, “sku”: {
“name”: “Standard_LRS”
},
“kind”: “StorageV2”, “properties”: {
“accessTier”: “Hot”
}
}
]
}
Compare that to the next 14-line block of code that represents the same storage account, but as a Bicep file. The format is easier to read and write when creating files for Infrastructure as Code (IaC) or other automation.
param location string = resourceGroup().location
param storageAccountName string = ‘toylaunch${uniqueString(resourceGroup().id)}’ resource storageAccount ‘Microsoft.Storage/storageAccounts@2021-06-01’ = {
name: storageAccountName location: location
sku: {
name: ‘Standard_LRS’
kind: ‘StorageV2’ properties: {
accessTier: ‘Hot’
}
}
Bicep files still have parameters and variables, but also allow you to include loops, condi-tional values, deployment scopes, and more in the deployment process.
Install the Bicep tools
The Bicep tools are available as extensions in both Visual Studio Code and Visual Studio. With this extension, you can use the features of Visual Studio Code, such as IntelliSense, to help author your Bicep files. Figure 3-8 shows the Bicep extension for Visual Studio Code.

FIGURE 3-8 The Bicep extension for Visual Studio Code
Author a Bicep file
After you install the Bicep extension for Visual Studio or Visual Studio Code, any time that you edit or create a new file with the .bicep extension, the Bicep extension will be available to assist in authoring your file.
For example, to use Bicep IntelliSense to begin creating a Bicep file for a storage account, simply type storage. The IntelliSense menu will provide an option of “res-storage.” Select the “res-storage” item and press Tab to automatically complete the required fields for the storage account. You could then change these values to parameters or variables for other use in the file. Figure 3-9 displays the IntelliSense option in Visual Studio Code.

FIGURE 3-9 The Bicep IntelliSense option for storage accounts
Deploy a Bicep file
After you have created the Bicep file with the parameters, variables, resources, and other components that you might need to deploy in your Azure subscription, you can submit the Bicep file for deployment. Bicep will then translate your file to an ARM template and submit the template for deployment.
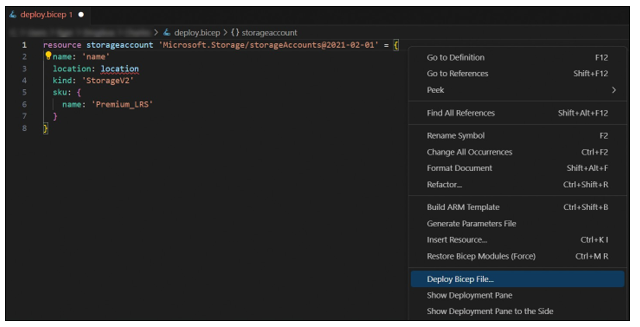
You can deploy the Bicep file directly from either Visual Studio or Visual Studio Code by right-clicking in the .bicep file, as shown in Figure 3-10. This assumes that you are authenticated to your Azure subscription from Visual Studio or Visual Studio Code.

FIGURE 3-10 The Bicep context menu with the Deploy Bicep File option
You can also deploy a Bicep file from the CLI or PowerShell by submitting the file for deploy- ment. If you plan to use the cloud shell, you must first upload the bicep file to the cloud shell environment. The following Azure CLI command deploys the deploy.bicep file to a resource group named az104-rg1.
az deployment group create –resource-group ‘az104-rg1’ –template-file deploy.bicep
From PowerShell, use the New-AzResourceGroupDeployment cmdlet to deploy a Bicep file. The following command also deploys the file to the same resource group.
New-AzResourceGroupDeployment -ResourceGroupName ‘az104-rg1’ -TemplateFile ./deploy. bicep
