Configure custom DNS settings
When a virtual machine connects to a virtual network, it receives its IP address via DHCP. As part of that DHCP exchange, DNS settings are also configured in the VM. By default, VMs are configured to use recursive DNS servers in Azure. These provide name resolution for internet- hosted domains, plus private VM-to-VM name resolution within a virtual network.
The hostname of the VM is used to create a DNS record mapping to the private IP address of the VM. You specify the hostname—which is simply the VM name—when you create the virtual machine. Azure specifies the DNS suffix, using a value that is unique to the virtual network. These suffixes end with internal.cloudapp.net. The hostname and DNS suffix together form the unique fully qualified domain name.

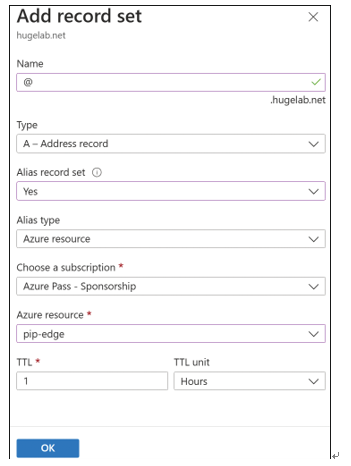
FIGURE 4-49 The Add Record Set blade for an alias record set
Name resolution for these DNS records is private—they can only be resolved from within the virtual network. The DNS suffix is configured as a lookup suffix within each VM, so names can be resolved between VMs within the virtual network using the hostname only.
This built-in DNS service uses the IP address 168.63.129.16. This is a special static IP address that is reserved by the platform for this purpose. This IP provides both the authoritative DNS service for Azure-provided DNS as well as the Azure recursive DNS service, which is used to resolve internet DNS names from Azure VMs. This IP is used for other things as well, such as health problems from Azure Load Balancer, heartbeat messages for PaaS roles, and so on.
BRING YOUR OWN DNS
Alternatively, you can configure your own DNS settings, which will be configured during the DHCP exchange on the VMs instead. This enables you to specify your own DNS servers, either in Azure or running on-premises. With your own DNS servers, you can support any DNS scenario, including scenarios not supported by the Azure-provided service. Example scenarios requiring you to use your own DNS servers include name resolution between VMs in different virtual networks, name resolution between on-premises resources and Azure virtual machines, reverse DNS lookup of internal IP addresses, and name resolution for non-internet-facing domains, such as domains associated with Active Directory.
You should not specify your own DNS settings within the VM itself because the platform is unaware of the settings you have chosen. Instead, Azure provides configuration options within the virtual network settings. These DNS server settings are at the virtual network level and apply to all VMs in the virtual network.
You can also specify VM-specific DNS server settings within each network interface. This takes precedence over settings at the virtual network level. Where multiple VMs are deployed in an availability set, setting DNS servers at the network interface, all VMs in the availability set are updated. The DNS servers applied are the union of the network interface-level DNS servers from across the availability set.

You can use these DNS settings to direct your VMs’ DNS queries to any DNS servers you choose. They can point to IP addresses of on-premises servers, such as an Active Directory Domain Controller or network appliance, a DNS service running in an Azure virtual machine, or anywhere else on the internet.
If you use your own DNS servers, those servers will need to offer a recursive DNS service, otherwise name resolution for internet domains from your virtual machines will break. If you point the DNS settings directly at an internet-based recursive DNS service, such as Google 8.8.8.8, then you will not be able to perform VM-to-VM lookups.

One challenge when using your own DNS servers is that you need to register each VM in your DNS service. To do this, you can configure the DNS service to accept Dynamic DNS que- ries, which the VM will send when it boots. This allows the VMs to register with the DNS server automatically. A problem with this approach is that the DNS suffix in the Dynamic DNS query must match the DNS zone name configured on the DNS server, and Azure does not support configuring the DNS suffix via the Azure platform settings. As a workaround, you can configure the correct DNS suffix within each VM yourself, using a start-up script.
CONFIGURE CUSTOM DNS SETTINGS USING THE AZURE PORTAL
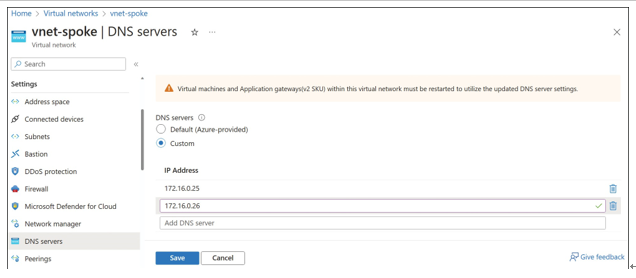
To configure the DNS servers on a VNet, open the virtual network blade, and then click DNS Servers under Settings on the left, as seen in Figure 4-50. You can then enter the DNS servers you want this VM to use. After saving your changes, you need to restart the VMs in the VNet to pick up the changes.

FIGURE 4-50 Custom DNS servers for a virtual network configured using the Azure portal
The steps to configure the DNS servers on an individual VM are similar to what is displayed in Figure 4-50. Open the blade for the VM’s network interface, and then click DNS Servers under Settings. You can then enter the DNS servers you want this VM to use. Note that VMs in an availability set will adopt the union of DNS servers from network interfaces across the avail- ability set. After saving your changes, your VM (or VMs in the availability set) will automatically restart to pick up the changes.
