Create an Azure container registry
You can use any of the available tools to deploy an ACR instance: the Azure portal, CLI, PowerShell, or REST API. You can also automate the deployment by using ARM templates or Bicep files. To create an instance from the Azure portal, follow these steps:
- From the Azure portal, search for Container registries.
- On the Container Registries blade, click Create.
- On the Basics tab of the Create Container Registry blade, complete the fields and then click Next. The fields on the Basics tab, as shown in Figure 3-38, include
■ Subscription The Azure subscription to deploy the resource to.
■ Resource Group The logical resource group for the resource.
■ Registry Name The name of the resource, which must be globally unique across all Azure customers and regions, and can only contain 5–50 alphanumeric characters.
■ Location The Azure region to deploy the resource to.
■ Use Availability Zones Whether the ACR is zone-redundant, only available with Premium tier.
■ Pricing Plan The tier of service: Basic, Standard, or Premium.
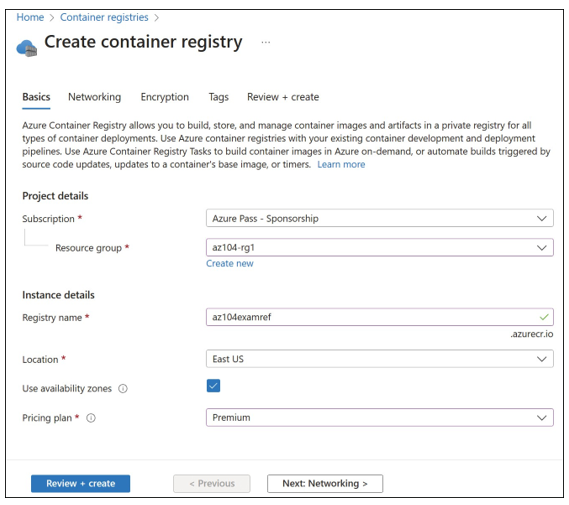
FIGURE 3-38 The Basics tab of the Create Container Registry blade
4. On the Networking tab, choose either Public Access or Private Access for the registry. Private access requires creating a private endpoint connection for the ACR but is only available for the Premium tier. Figure 3-39 displays the Networking tab.
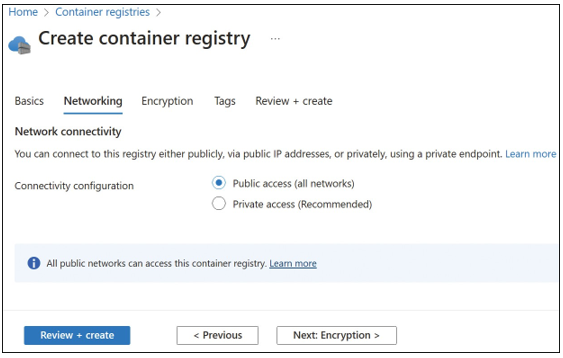
FIGURE 3-39 The Networking tab of the Create Container Registry blade
5. On the Encryption tab, choose whether to use a customer-managed encryption key or to accept the default Microsoft-managed platform key. Selecting Enabled for the Customer-Managed Key requires that a key be created in an Azure Key Vault and a managed identity has been created and given permissions to access the key from the vault. Figure 3-40 displays the Encryption tab with these settings selected.
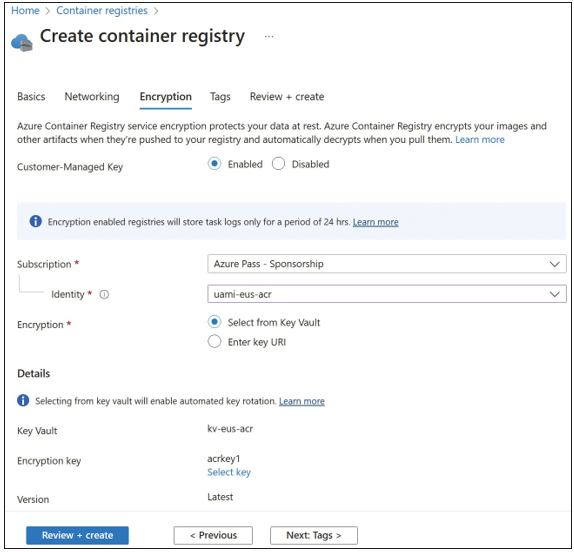
FIGURE 3-40 The Encryption tab of the Create Container Registry blade
6. Click Review + Create. Verify that you have configured the ACR as required for your scenario and then click Create. The deployment will be submitted and an ACR instance created in the region that you selected during deployment.
Manage an Azure Container Registry
After you deploy the ACR, you can modify the networking, identity, and encryption options that were configured during deployment. The only option you cannot change after deploy- ment is whether the registry is zone-redundant.
GETTING STARTED
To get started with your new ACR instance, the most common actions are to log in and then push or pull images to and from the registry. This assumes that you already have Docker installed on your local machine to use with the registry.
To log in to your registry, navigate to the Access Keys blade of the registry. Check the box next to Admin User to activate the admin account for the registry; it will provide two passwords to use with the account. The Access Keys blade is shown in Figure 3-41.
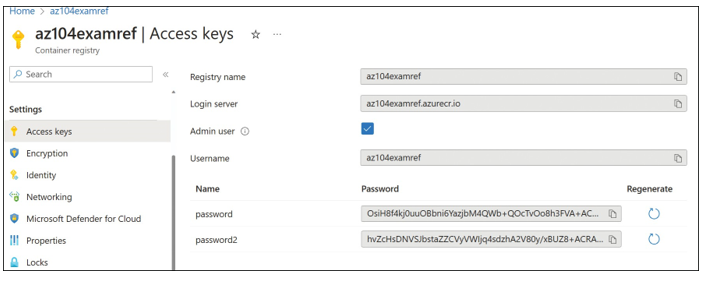
FIGURE 3-41 The Access Keys blade of an Azure Container Registry
After you obtain the login URI and credentials from the Access Keys blade, use the following Docker command to log in to the registry, replacing registryname with the name of your resource:
docker login registryname.azurecr.io
After you successfully authenticate, you can tag an image and push the image to your repository using the following commands:
docker tag hello-world registryname.azurecr.io/hello-world docker push registryname.azurecr.io/hello-world
Finally, after the image has been pushed to the container, you can pull it when necessary.
To pull an image from a registry, run the following command:
docker pull registryname.azurecr.io/hello-world
Webhooks can be used to trigger specific events when an action has occurred in the repository. This could be for all repository items or for specific tags. If you have enabled geo-replication to another Azure region, you can also configure the webhook to respond to specific region-based events.
To create a webhook from the Azure portal, navigate to the container registry and then select Webhooks. On the Webhooks blade, click Add. The configuration items for a webhook include
- Webhook Name The alphanumeric name of the webhook, including 5–50 characters.
- Location The Azure region where the webhook is deployed. If using a replica, select the region of the replica instance.
- Service URI The URI where the webhook sends POST notifications.
- Custom Headers Any custom header that should be included with the POST notification.
- Trigger Actions The actions on the repository that should trigger the webhook. These can include push and delete for both images and Helm charts.
- Active Status Whether the webhook is enabled or not.
- Scope Specific tags that the webhook should apply to or blank to apply to all items in the repository.
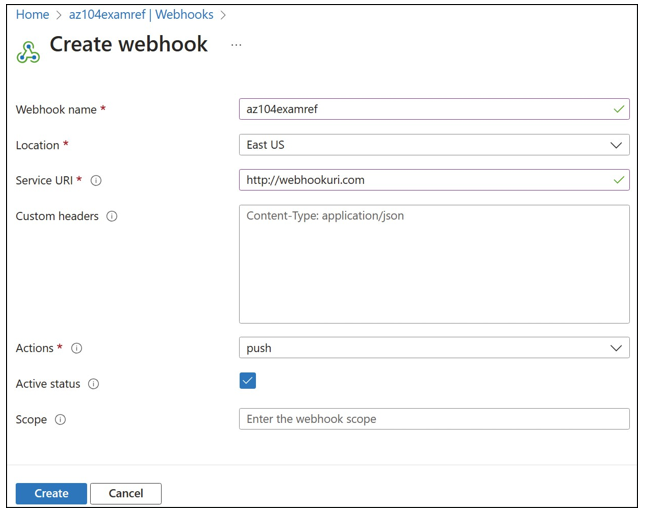
Figure 3-42 shows a sample webhook being created.
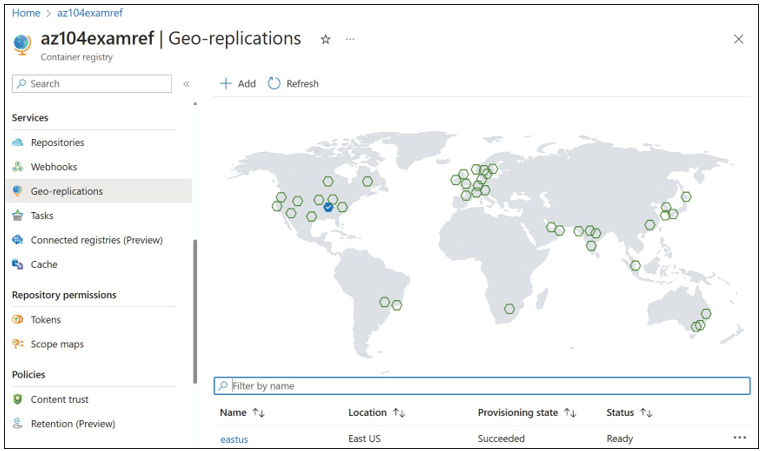
FIGURE 3-42 The Create Webhook blade for an Azure container registry
If you have business or technical requirements that the images in the repository be replicated to another Azure region, you must deploy the ACR in the Premium tier. This will allow you to select additional Azure regions to replicate the data to.
To enable replication, navigate to the ACR instance in your subscription and select Geo- replications. A world map with selectable icons will be displayed, as shown in Figure 3-43. Select a region icon on the map to open the Create Replication blade.
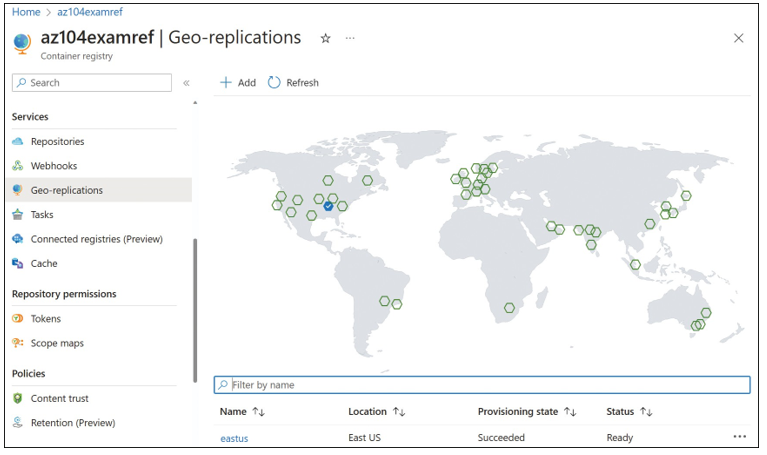
FIGURE 3-43 The Geo-replications blade of an Azure container registry
