Create and configure an application security group
Application security groups (ASGs) are separate objects that you create in your Azure subscrip- tion. You can think of an ASG like a group object in an identity system–members of the group have the permissions and access that are assigned to the group. ASGs work in a similar way— you add NICs to the group, then create NSG rules that apply to the ASG. Then, any network interface that is a member of the ASG will have the NSG rules applied.
To create an ASG, do the following:
- From the Azure portal, search for Application security groups.
- On the ASG blade, click Create.
- On the Create An Application Security Group blade, complete the required fields:
Subscription, Resource Group, Name, and Region. - Click Review + Create, and then click Create. A sample is displayed in Figure 4-28.
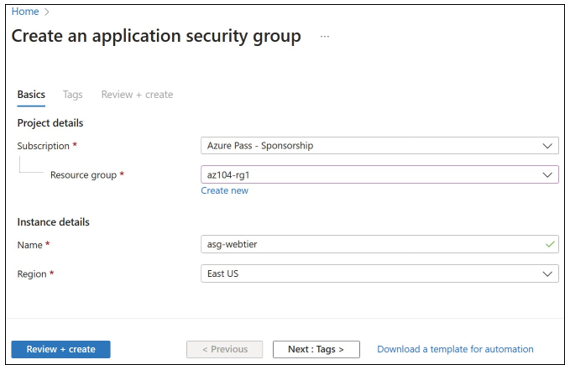
FIGURE 4-28 Creating a new ASG named asg-webtier
After you create an ASG, the next logical step is to associate network interfaces with the group. This action is performed from the virtual machine object that has the NIC associated with it. To add the NIC to an ASG, navigate to a virtual machine.
- On the VM object, click Networking.
- On the VM Networking blade, ensure that the NIC you want to configure is selected,
and then click the Application Security Groups tab, as shown in Figure 4-29.
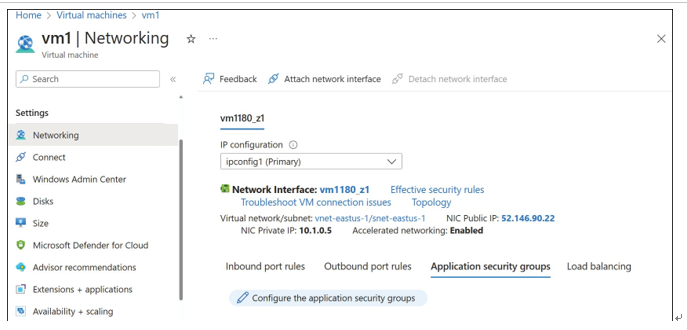
FIGURE 4-29 The Networking blade of a VM
- On the Application Security Groups tab, click Configure The Application Security
Groups. - On the Configure The Application Security Groups blade, select the ASG you have cre- ated from the Application Security Groups drop-down menu, as shown in Figure 4-30. Then click Save.
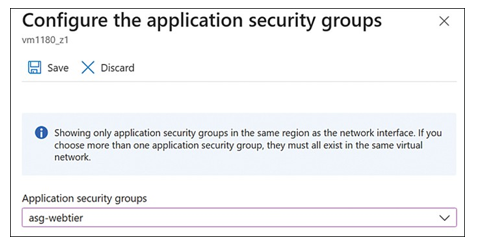
FIGURE 4-30 Configure the Application Security Groups blade
After you have created an ASG and added one or more network interfaces to it, you can use the ASG as part of an NSG rule. To do so, select Application Security Group as the Destination Type. Then, from the Destination Application Security Groups menu, select the ASG that you created. An example of modifying the rule that was created earlier in this skill is displayed in Figure 4-31.
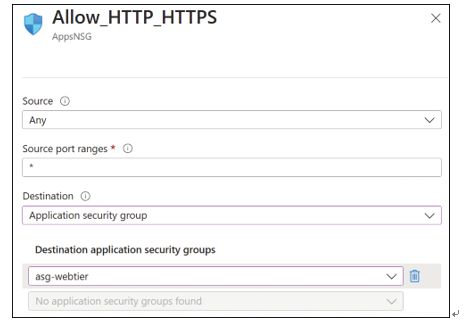
FIGURE 4-31 Using an ASG as part of an NSG rule
Evaluate effective security rules
When troubleshooting networking issues, it can be useful to have deeper insight into exactly how NSGs are being applied. When NSG rules are defined using service tags and application security groups, instead of explicit IP addresses or prefixes, it sometimes isn’t clear whether a particular flow matches a particular rule.
The Effective Security Rules view is designed to provide this insight. You can drill into each NSG rule and see the exact list of source and destination IP prefixes that have been applied, regardless of how the NSG rule was defined.
To access the Effective Security Rules view, your virtual machine must be running because
the data is taken directly from the configuration of the running VM.
Using the Azure portal, open the Virtual Machine blade and then click Networking. This will show the networking settings, including the NSG rules and a convenient Add Inbound Port Rule button. Near the top of this blade, click Effective Security Rules, as shown in Figure 4-32, to open the Effective Security Rules blade.
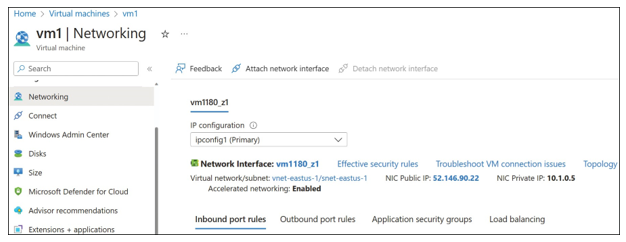
FIGURE 4-32 Azure virtual machine Networking blade
The Effective Security Rules blade (see Figure 4-33) looks very similar to the Networking blade shown in Figure 4-32. It shows the name of the network interface and associated NSGs, along with a list of NSG rules.
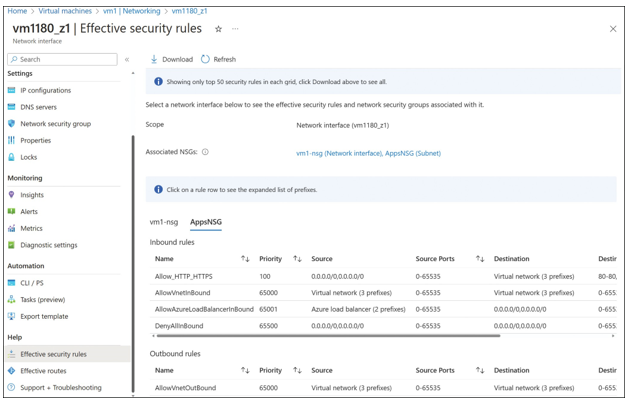
FIGURE 4-33 Azure virtual machine Effective Security Rules blade
The difference becomes clear when you click one of the NSG rules, which displays the exact source and destination IP address prefixes used by that rule. For example, in Figure 4-34, you can see the exact list of IP address prefixes used for the Allow_HTTP_HTTPS rule.
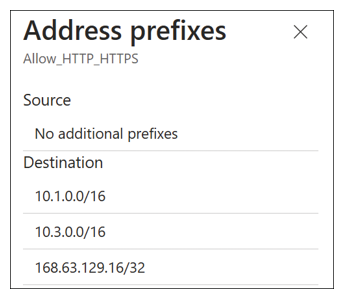
FIGURE 4-34 Effective Security Rules blade showing internet address prefixes
With the exact list of address prefixes for each NSG rule, you can investigate networking issues without fear of any ambiguity about how NSG rules are defined.
