Create and configure backup policy
You can edit a policy, associate more VMs to a policy, and delete unnecessary policies to meet compliance requirements.
To view your current backup policies in the Azure portal, open the Recovery Services vault blade, and then click Backup Policies, as shown in Figure 5-70. Click an existing policy to view the policy details, or click Add to create a new policy.
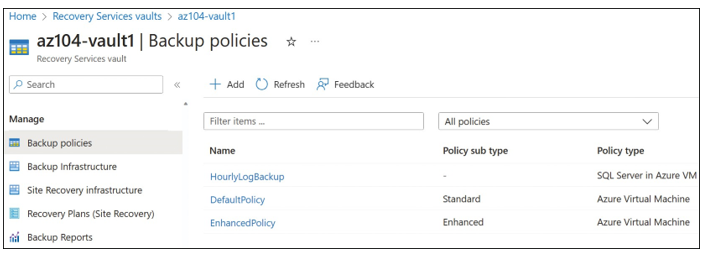
FIGURE 5-70 Backup policies in the Recovery Services vault
You can create five different types of policies from this view, as shown in Figure 5-71:
- Azure Virtual Machine Specify the backup frequency, retention period, and the backup point on a weekly, monthly, and yearly schedule.
- Azure File Share Schedule a daily backup for an Azure file share.
- SQL Server In Azure VM Use SQL Server-specific backup technology, such as full, differential, and log backups, with an associated schedule for each option. Also, you can enable SQL backup compression.
- SAP HANA In Azure VM (Database via Backint) Use SAP HANA—specific backup technology such as full, differential, and log backup with an associated schedule for each option.
- SAP HANA In Azure VM (DB instance via snapshot) Use a snapshot to back up a SAP HANA instance.
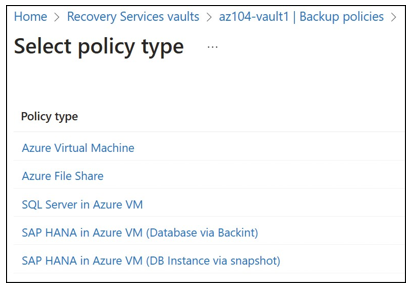
FIGURE 5-71 Available backup policy options in the Azure portal
Define backup policies
An Azure Backup policy defines how often backups occur and how long the backups are retained. The default policy accomplishes a daily backup at 05:30pm UTC and retains backups for 30 days. You can define custom backup policies. In the Frequency drop down menu, you can choose from Daily, Weekly, Monthly, and Yearly options. In Figure 5-72, a custom backup policy is configured.
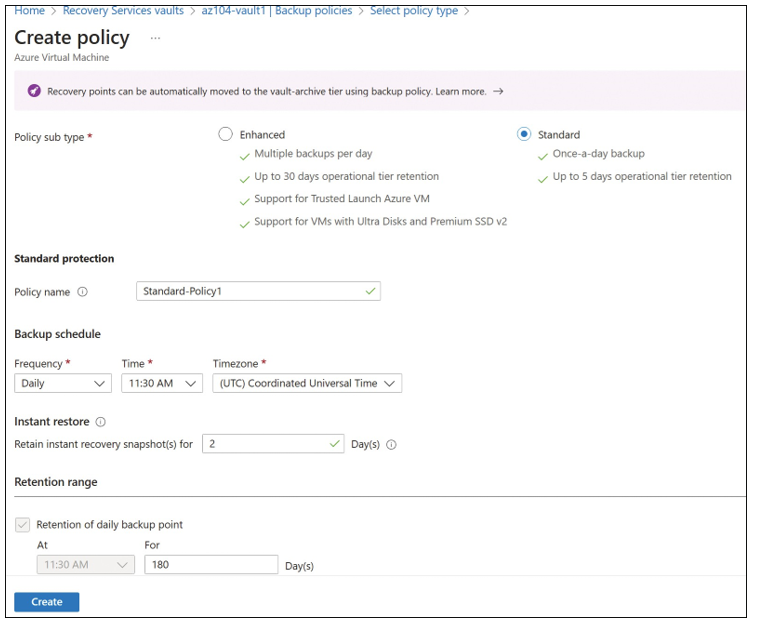
FIGURE 5-72 Configuring a custom backup policy
Implement backup policies
To implement a backup policy, open the policy in the Azure portal and click Associated Items, as shown in Figure 5-73.
The Associated Items blade in Figure 5-74 shows all the resources currently associated with the policy.
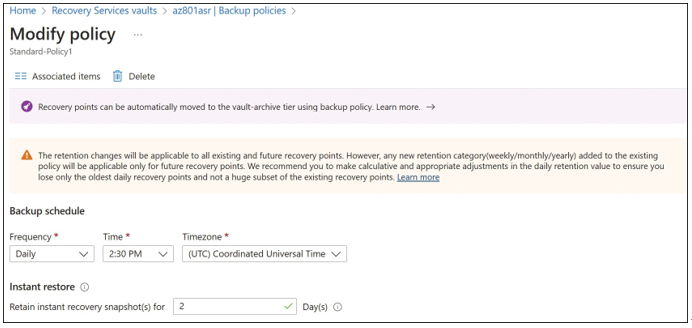
FIGURE 5-73 Associated Items in the Modify Policy blade
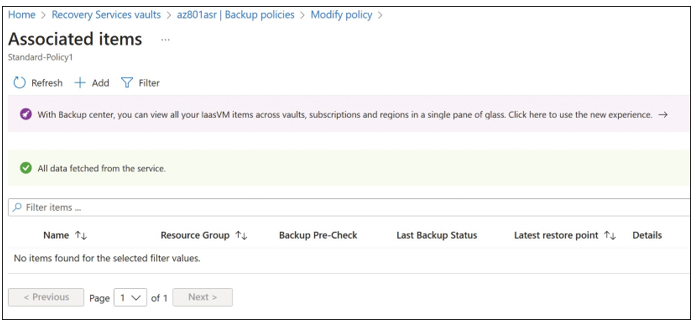
FIGURE 5-74 The Associated Items blade for the backup policy
Clicking Add will open the Backup Goal blade, where you can add other virtual machines or file shares to be backed up using the goals defined in the policy.
Configure and review backup reports
Using Azure Backup reports, you can visualize data across your Recovery Services vaults and Azure subscriptions to provide insight into your backup activity. This report- ing solution is currently widely supported for Azure virtual machine backup and file and folder backup scenarios when using the MARS (Microsoft Azure Recovery Services) agent. For other supported scenarios, see https://learn.microsoft.com/azure/backup/ configure-reports?tabs=recovery-services-vaults#supported-scenarios.
To configure the backup reports, you need to create or use an existing Log Analytics workspace to store the backup reporting data. Also, you need a Recovery Services vault, which records all the backup operations as diagnostic data. Creating a Recovery Services vault is discussed earlier in Skill 5.2 in this chapter (see “Create a Recovery Services vault”). To configure diagnostics for the Recovery Service Vault, open the Recovery Services vault and then choose Diagnostic Settings, Add Diagnostic Setting (see Figure 5-75).
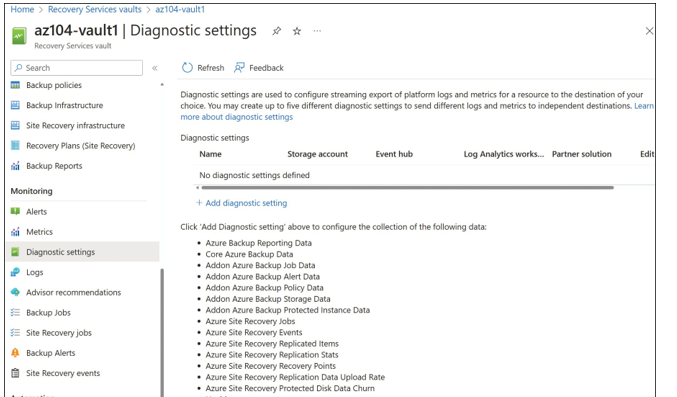
FIGURE 5-75 Diagnostic settings for the Azure Recovery Services vault
In this example, log categories were chosen as shown in Figure 5-76, and data is configured to be sent to the Log Analytics workspace with the default 30-day retention setting. If you want to retain data for more than 30 days, you need to update the Retention setting in the Log Analytics workspace.
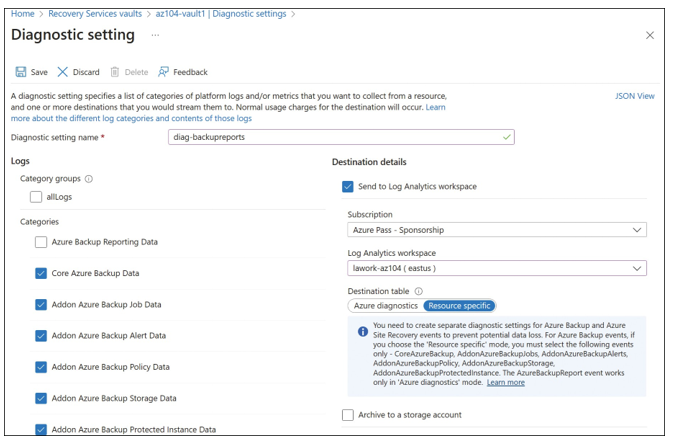
FIGURE 5-76 Diagnostic settings for the Azure Recovery Services vault
Once diagnostic settings are configured, you can view the backup report data in the Recovery Services vault by clicking Backup Reports under Manage, as shown in Figure 5-77.
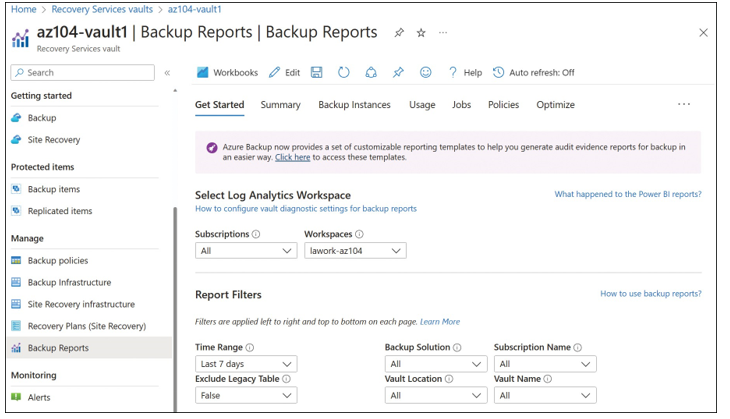
FIGURE 5-77 Backup reports for the Azure Recovery vault
