Skill 3.2: Create and configure virtual machines
There are multiple ways to create and configure virtual machines, depending on your intended use. The easiest way to create an individual virtual machine is to use the Azure portal. If you have a need for automated provisioning (or you just enjoy the command line), the Azure PowerShell cmdlets and the Azure command-line interface (CLI) are a good fit and supported across multiple platforms. For more advanced automation—even including orchestration of multiple virtual machines—Azure Resource Manager templates and Bicep files can also be used. Each method brings its own capabilities and tradeoffs, and it is important to understand which tool should be used in the right scenario. This section covers various aspects and features to efficiently manage VMs and supporting resources in an Azure environment.

Create a virtual machine
Virtual machines in Azure are one of the core compute options available, and offer the most flexibility and control in your environment. As with on-premises VMs, you are responsible for managing the VM, accounts, data security, patches and updates, and more.
Before you create a VM, there are several parameters that you should consider. Your orga- nization might have other business or technical requirements to meet that aren’t specifically mentioned here. The minimum considerations include
- Naming the VM resources
- The Azure region to deploy to
- The size and SKU of the VM
- Subscription quotas or limits
- VM operating system requirements
- VM configuration
- Related resources
When you use the Azure portal to deploy a VM, it separates the required information into a series of tabs in the Create A Virtual Machine blade. The tabs for creating a VM include
- Basics
- Disks
- Networking
- Management
- Monitoring
- Advanced
- Tags
Basics
To use the Azure portal to create a virtual machine, search for Virtual Machines. On the Virtual Machines blade, select Create and then select Azure Virtual Machine. The Basics tab will appear, where you can configure the following information:
- Subscription The Azure subscription that the VM will deploy to.
- Resource Group The resource group that the VM will logically be associated with.
- VM Name The name of the virtual machine resource.
- Region The Azure region where the VM will be deployed.
- Availability Options The target redundancy for the VM. These are discussed more later in this skill.
- Security Type Choose between standard, trusted launch, or a confidential VM.
- Image The operating system image to use for the VM.
- VM Architecture Choose between Arm64 or x64 processor architecture.
- Run With Azure Spot Discount Whether the VM is an Azure Spot instance. Azure Spot instances are less expensive but could be deallocated by Azure. These are typically used in dev/test or stateless compute environments.
- Size The SKU of the VM, which determines the CPUs, Memory, Disk, and Networking capabilities. The SKU is the primary cost for running the VM.
- Authentication Details Either username and password or SSH key information to authenticate to the VM.
- Inbound Ports Whether the default network security group (NSG) that is created has any configured allow rules.
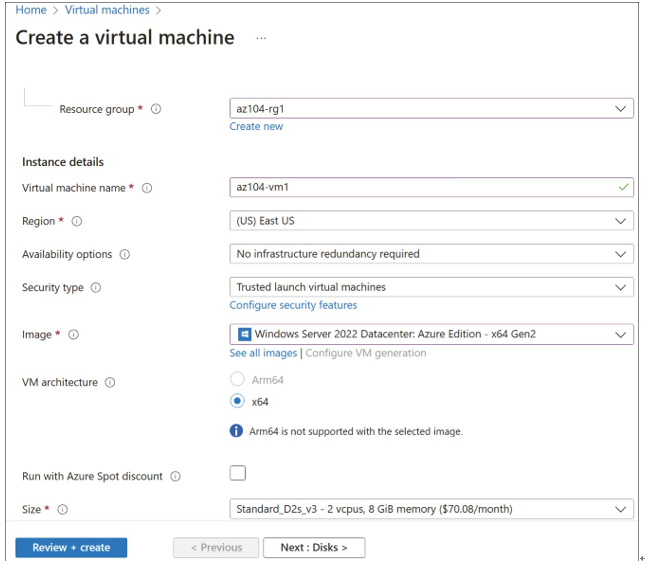
Figure 3-11 shows the completed fields for a new VM named az104-vm1.

FIGURE 3-11 The Basics tab of the Create A Virtual Machine blade
