Suppose you received a task to create a share so that the owner of vm-a and the owner of vm-b can work together on documents in a folder structure. Both VMs are deployed as Compute Engine VMs that run in the europe-central2 region with an NFS client already installed. The files take around 500 GB now, but the capacity can increase. Also, you need to set up a backup so that you can restore it if one of the owners deletes a file accidentally. The budget is limited. You decide to use a Filestore share and mount it to VMs. We assume you have a Cloud Filestore Editor role so you can create Filestore instances. Here are the steps you should follow to achieve it:
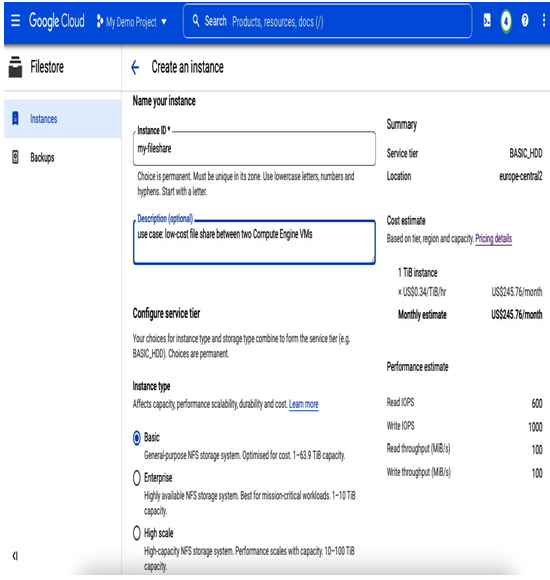
- In the Navigation menu, go to the Storage section, select Filestore, and go to Instances. A Create an instance menu opens, as shown in the following screenshot:

Figure 8.23 – Creating a Filestore instance
- Provide a unique name for your instance (for example, my-fileshare) and a description.
- Select Basic for Instance type because the budget is limited, and the workload (sharing documents) doesn’t seem to require high performance or high availability. Under the Instance type section, you will find a Storage type section. Select HDD as we are looking for the lowest price. You can check the prices on the right-hand side in the Cost estimate section.
- In the Allocate capacity section, provide a 1 TiB value, as this is the minimal amount you can deploy with this storage type. Also, you can increase the instance capacity later up to 63.9 TiB as you already know that the owners plan to create more files.
- In the Choose where to store data section, select the region where vm-a and vm-b run, so in this case, europe-central2. This way, you will ensure the lowest latency. Also, you will not be charged for ingress traffic to Filestore or egress traffic to a client if they are located within the same zone.
- In the VPC network section, select a network that both VMs use to ensure network connectivity. The networking and VPCs will be explained in detail later in Chapter 9.
- In the Configure file share name section, set the name for the share that VM owners will use to mount this share. In our case, it will be documents.
- Note that you can also use the gcloud command line to create the instance:
gcloud filestore instances create my-fileshare –zone=europe-central2-a –tier=BASIC_HDD –file-share=name=”documents”,capacity=1TB –network=name=”my-network”
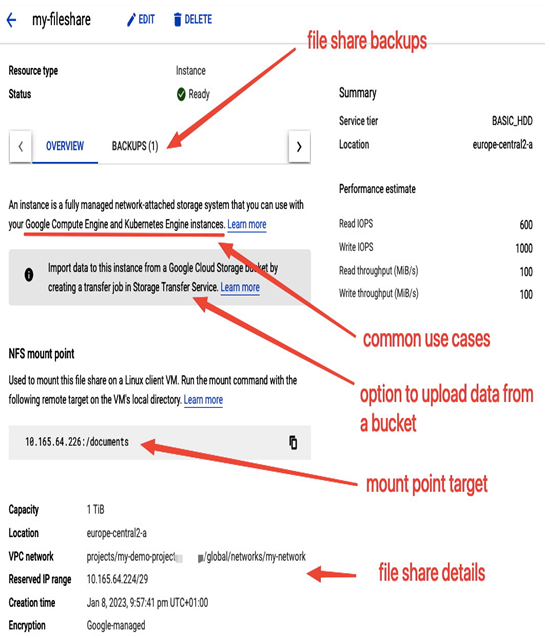
- Wait for the my-fileshare instance to be created and select it to view more details. Then, in the OVERVIEW section, look for NFS mount point and copy it. In the following screenshot, you can see that there is the 10.165.64.226:/documents NFS mount point:

Figure 8.24 – Viewing details of a Filestore instance
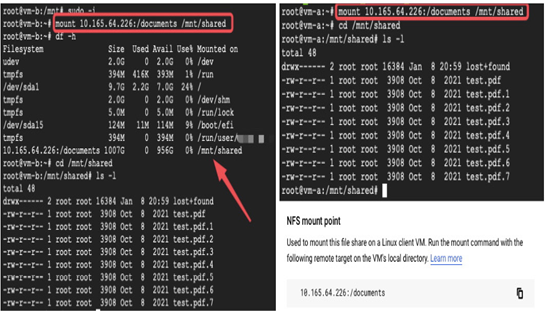
- Ask VM owners to SSH to their instances and create a folder under the /mnt directory (for example, /mnt/shared), and run the following command as a root:
mount 10.165.64.226:/document /mnt/shared
They can now go to /mnt/shared and see the files served from the my-fileshare instance, as shown in the following screenshot. You can also grant the owners Cloud Filestore Viewer roles, so they can check the mount point details themselves in the Google Cloud console:

Figure 8.25 – Mounting the remote target on the VM’s local directories
- The last task is to run a backup task from time to time to be able to restore the files if someone deletes them. Edit the Filestore instance and select Create a backup. Provide a name and location and select CREATE.
