Dataflow is a fully managed service that allows data modifications and enhancements in batch and stream modes. It provides automated provisioning and management of compute resources. Dataflow allows you to use Apache Beam, an open source unified model for defining batch and streaming data processing pipelines. You can use the Apache Beam programming model and Apache Beam SDK.
Dataflow provides templates that can accelerate product adoption.
Dataflow architecture
Dataflow provides several features that help you run secure, reliable, fast, and cost-effective data pipelines at scale. They are as follows:
• Autoscaling: Horizontal (scale out – the appropriate number of workers is selected) and vertical autoscaling (scale up – Dataflow dynamically scales up or down memory available to workers) allow you to run jobs in a cost-efficient manner.
• Serverless: Pipelines that use Dataflow Prime benefit from automated and optimized resource management, reduced operational costs, and improved diagnostics capabilities.
• Job Monitoring: Seeing and interacting with Dataflow jobs is possible. In the monitoring interface, you can view Dataflow jobs via a graphical representation of each pipeline, along with each job’s status.
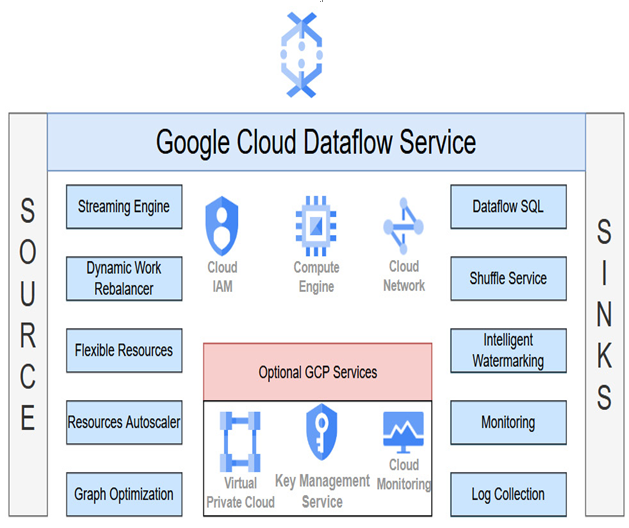
The following figure shows the Dataflow architecture, where we can see tight integration with core Google Cloud services and possibilities to interact with the service by using Dataflow SQL:

Figure 10.3 – High-level Dataflow architecture
You can also use Customer Managed Encryption Keys (CMEKs) to encrypt data at rest and specify networks or subnetworks with VPC Service Controls.
Now that we’ve learned about the architecture and use cases for each data processing product, we should learn how to initialize and load data into them.
Initializing and loading data into data products
In this practical part of the chapter, we will focus on initializing and loading data into the previously described data products. Covering such practical exercises and providing an architecture overview allow us to understand the products better.
Pub/Sub and Dataflow
The first example will combine the usage of three data products: Pub/Sub, Dataflow, and Cloud Storage. The Pub/Sub topic will read messages published to a topic and group the messages by timestamp. Ultimately, these messages will be stored in a Cloud Storage bucket:
- Before we start, we need to enable a few APIs – Dataflow, Compute Engine, Cloud Logging, Cloud Storage, Google Cloud Storage JSON API, Pub/Sub, Resource Manager, and Cloud Scheduler.
- In Cloud Shell, run the following command:
gcloud services enable dataflow.googleapis.com compute.googleapis.com logging.googleapis.com storage-component.googleapis.com storage-api.googleapis.com pubsub.googleapis.com cloudresourcemanager.googleapis.com cloudscheduler.googleapis.com
Our solution will create a new service account and grant it several roles to interact with multiple services. Those roles have the /dataflow—worker, roles/storage.objectAdmin, and roles/pubsub.admin rights.
- We must create a new service account with the following gcloud command:
gcloud iam service-accounts create data-services-sa
- Once our service account has been created, we can grant roles to it. We can do so by executing the following command and specifying the previously mentioned roles – that is, roles/dataflow. worker, roles/storage.objectAdmin, and roles/pubsub.admin:
gcloud projects add-iam-policy-binding wmarusiak-book-351718 –member=”serviceAccount data-services-sa@wmarusiak-book-351718 .iam.gserviceaccount.com” –role=roles/dataflow.worker
- After adding these roles to the service account, we can grant our Google account a role so that we can use the previously created roles and attach the service account to other resources. To do so, we need to execute the following code:
gcloud iam service-accounts add-iam-policy-binding [email protected] –member=”user:YOUR_EMAIL_ADDRESS” –role=roles/iam.serviceAccountUser
- Now, we must use service credentials to be configured as default application credentials. In Cloud Shell, run the following code:
gcloud auth application-default login
- The next step involves creating a Cloud Storage bucket name. We must execute the gsutil mb gs://YOUR_BUCKET_NAME command in Cloud Shell. Please replace the bucket name with a unique name – we used wmarusiak-data-services-bucket.
- Now that we’ve created the Cloud Storage bucket, we must create a Pub/Sub topic. We can use the gcloud pubsub topics create YOUR_PUB_SUB_TOPIC_NAME command to do so. We used wmarusiak-data-services-topic as our Pub/Sub topic name. Please replace the topic’s name with a unique name.
- To finish resource creation, we must create a Cloud Scheduler job in the working project. The job publishes a message to a Pub/Sub topic every minute. The command to create a Cloud Scheduler job is as follows:
gcloud scheduler jobs create pubsub publisher-job –schedule=”* * * * *” –topic=wmarusiak-data-services-topic –message-body=”Hello!” –location=europe-west1
- To start the job, we need to run the following gcloud command:
gcloud scheduler jobs run publisher-job –location=europe-west1
The last step involves downloading a Java or Python GitHub repository to initiate the necessary code quickly.
- We used Python code; you can use this instruction to download it:
git clone
https://github.com/GoogleCloudPlatform/python-docs-samples.git \ cd python-docs-samples/pubsub/streaming-analytics/
pip install -r requirements.txt # Install Apache Beam dependencies
- You can find the Python code by visiting the Google Cloud GitHub repository at https://github.com/GoogleCloudPlatform/python-docs-samples/blob/HEAD/pubsub/streaming-analytics/PubSubToGCS.py.
- The last step is to run the Python code. We need to replace the constants with our actual data:
python PubSubToGCS.py –project=$PROJECT_ID –region=$REGION –input_topic=projects/$PROJECT_ID/topics/$TOPIC_ID –output_path=gs://$BUCKET_NAME/samples/output –runner=DataflowRunner –window_size=2 –num_shards=2 –temp_location=gs://$BUCKET_NAME/temp –service_account_email=$SERVICE_ACCOUNT
- In our case, the code looks as follows:
python PubSubToGCS.py –project=wmarusiak-book-351718 –region=europe-west1 –input_topic=projects/wmarusiak-book-351718/topics/wmarusiak-data-services-topic –output_path=gs://wmarusiak-data-services-bucket/samples/output –runner=DataflowRunner –window_size=2 –num_shards=2 –temp_location=gs://wmarusiak-data-services-bucket/temp
–service_account_email=data-services-sa@wmarusiak-book-351718.iam.gserviceaccount.com
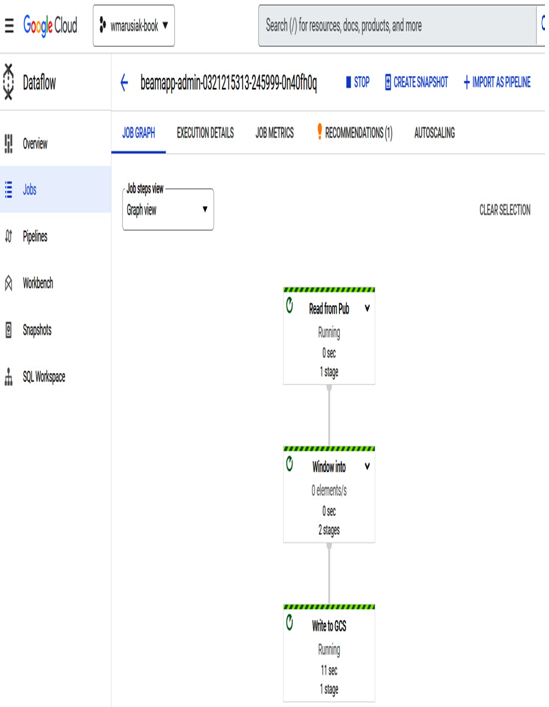
- Our Dataflow job runs, and messages flow from Cloud Scheduler to Pub/Sub:

Figure 10.4 – Dataflow job execution graph
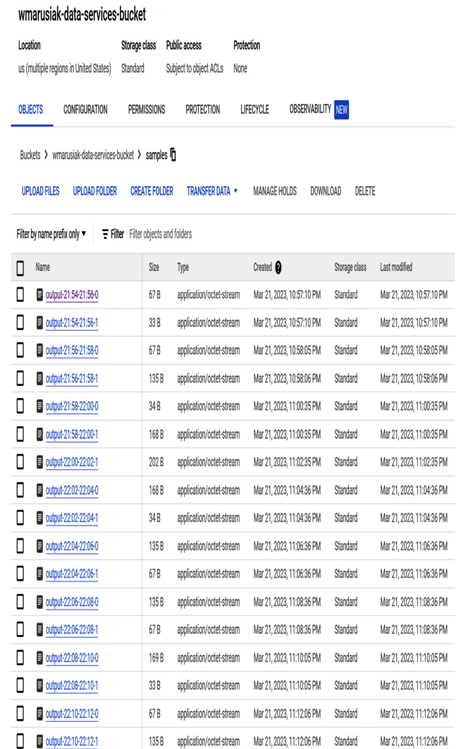
- We can also see the code output in the Cloud Storage bucket, which contains stored messages:

Figure 10.5 – Saved job output in the Cloud Storage bucket
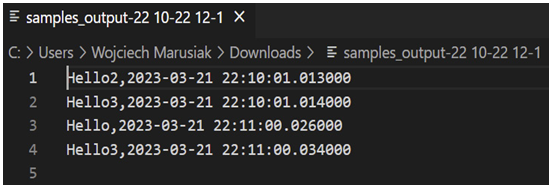
- We can download objects to view the content of processed messages:

Figure 10.6 – Content of processed messages
- To get a few more messages, we created two additional Cloud Scheduler services.
This example showed us the tight integration between Google Cloud products and how we can ingest incoming messages and process them in a few steps. In the next section, we will cover the Dataproc service.
