Further Salesforce CRM Content options
We can define multilanguage support in Setup | Salesforce CRM Content | Enable multilanguage search and contribute. With this option, a new Language picklist is shown when editing and searching for content in the Content page:
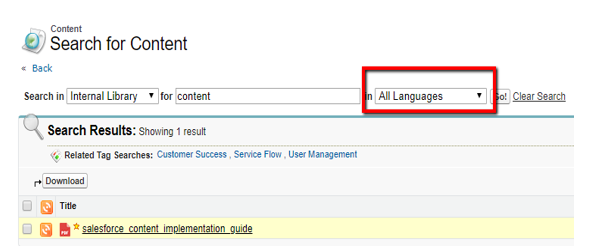
The language search filter for multilanguage setup
Moreover, libraries can be displayed on communities using branded images to speed up library identification (with Lightning Experience only).
For more information about setting up branded images, refer to Salesforce Help at https://help.salesforce.com/articleView?id=collab_files_customize_libraries.htm&type=5.
With the setup complete, we can now create and manage the content libraries in order to organize our content files. Let’s see how this is done in the next section.
Handling content libraries
The first step to enabling Salesforce CRM Content for your users is to set up a library, which is the control panel for storing, sharing, and managing files.
Each org can host up to 2,000 libraries (as of the winter 2020 release).
Perform the following steps to complete the setup:
- Let’s switch to Salesforce Classic and search for the Libraries tab:
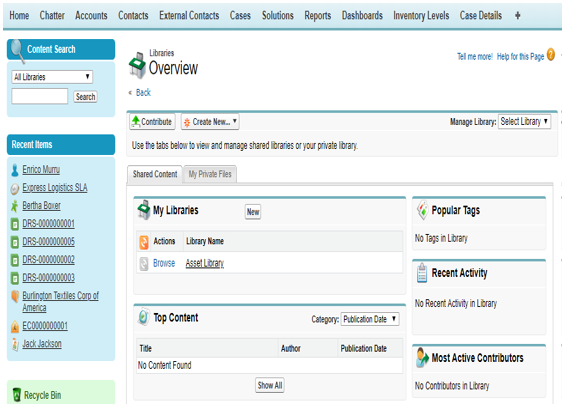
The Content Libraries tab
2. In the My Libraries section, click on the New button to create a new library. Fill in the Name, Unique Name, and Description fields, and then add new members in the Save and Add Members step:
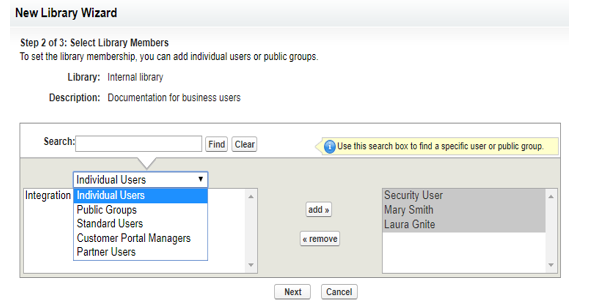
Adding members to a library
3. Click on Next to add permissions to each member:
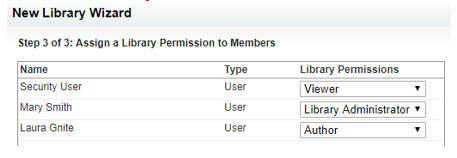
Setting up library permissions for library members
This setting gives a specific role to each user by providing Library Permissions. These determine the type of tasks a member can do in a particular library so that the same user can have different permissions within each library.
4. Navigate to Setup | Salesforce Files | Content Permissions and click on any preset permission (there should be three default permissions available: Library Administrator, Author, and Viewer):
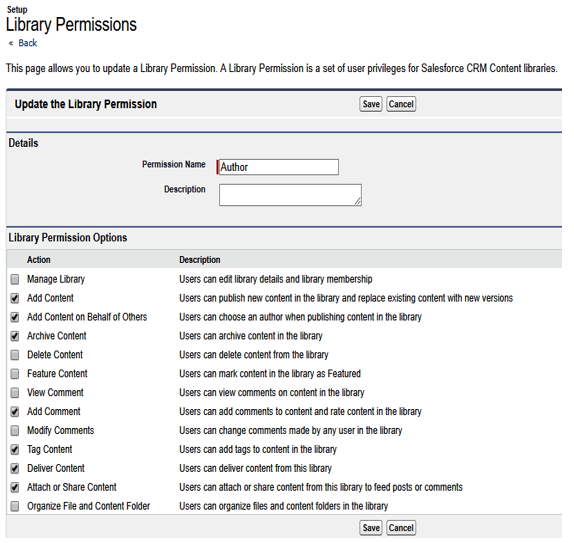
Salesforce CRM Content library permissions
For a detailed explanation of each option, refer to Salesforce Help at https://help.salesforce.com/articleView?id=content_workspace_perm_add.htm&type=5.
This is the status of our newly created library:
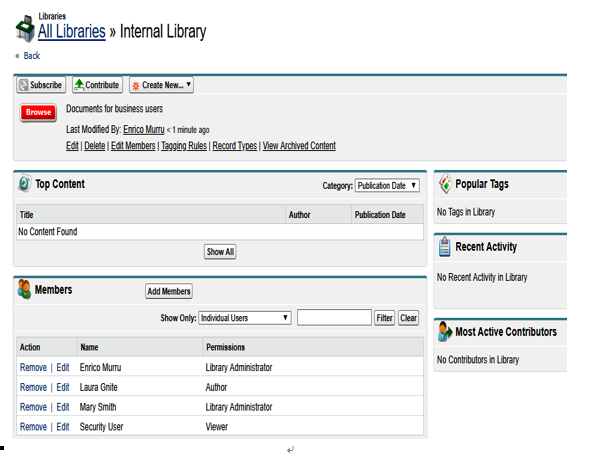
The Library layout
Another important feature of libraries is the ability to add tags to content files (which is also a way to filter out files when searching).
At the library level, we can define the following tagging rules (click on the Tagging Rules link in the library header):
- Open tagging: Contributors can add whatever tag they want on content. Salesforce will autosuggest tags based on a user’s recent activity and the Popular Tags list.
- Guided tagging: Contributors can always add whatever tag they like, but the system will guide them with a list of suggested tags, which we have to set up after setting up this rule’s value (you can refer to the following screenshot as an example).
- Restricted tagging: Contributors can only choose from suggested tags.
The following is an example of setting up Guided Tagging:
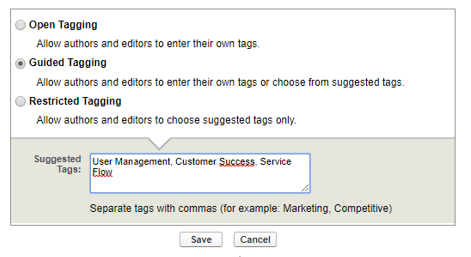
The Guided Tagging rule in the library
Remember the following:
- You can move content from one library to another and you will get an error if you move from a wider tagging rule library to a stricter tagging rule library and the content has unsupported tags.
- If a restricted tagging rule is applied after content has been added, invalid tags are still attached to the content (though not visible) and removed only when a new version of the content is published or tags are edited.
- A tag name cannot be edited or deleted; we can remove a tag from the content, but the tag will remain in the database.
- Tags are case insensitive.
- Try to limit the number of tags: they are used to segment search engine results and users can subscribe to them, so too many of them can cause clutter.
Another option to restrict the type of content available in a library is through record type restrictions, which are available by clicking on the Record Types link in the library record layout header:
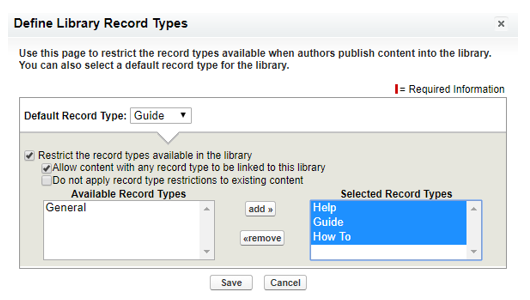
Restricting content with Record Types in a library
With this option, we can define the default record type given to content created from the following library. Flag the Restrict the record types available in the library checkbox if you want to actually restrict content types, flag the Allow content with any record type to be linked to this library checkbox to allow shared content from other libraries to be linked to this library without any record type restriction, or flag the Do not apply record type restrictions to existing content checkbox to apply restrictions to existing content as well (record type restrictions can be applied after the library has been created, so it may not be necessary to apply restrictions onto old content).
You can access Libraries from Lightning Experience via the Files tab:
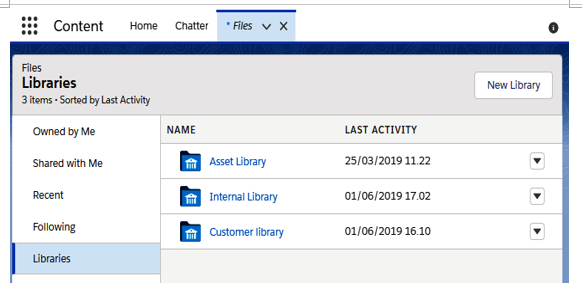
Library records accessible from Lightning Experience
From Lightning Experience, we can only set up membership (as demonstrated in the following screenshot) but no other setting (as of winter 2020):
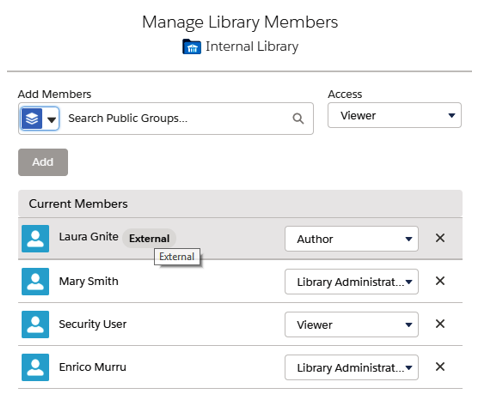
Membership editing on a library from Lightning Experience
In Lightning Experience, we can also create folders (and subfolders) to organize files within a library (not supported in Lightning Experience) using the New Folder button:
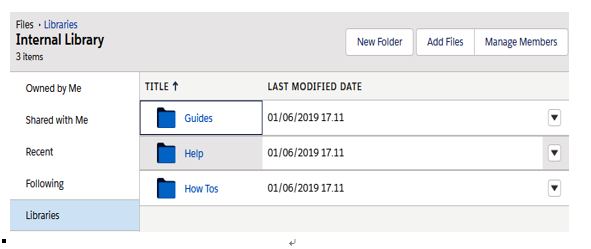
Folder setup in Lightning Experience in libraries
In the preceding screenshot, the Internal Library library has been configured with three subfolders: Guides, Help, and How Tos. In this way, content file organization becomes more organic and easy to browse.
Now it’s time to see how you can add files to libraries.
