Importing data with Data Loader
Data Loader is a standalone application that’s used to bulk import (and export) data. It can actually do all kinds of CRUD operations (insert, update, delete, and export).
To download the app, go to Setup | Integrations | Data Loader and select the download link for your operating system (Windows or macOS). The documentation links are also available on this page.
There is even a SaaS version of Data Loader called dataloader.io. It can be downloaded for free, but there will be some limitations regarding what features you can use. Alternatively, you can get the full-featured version if you’re willing to pay for additional licensing costs (https://dataloader.io/).
Data Loader can be used via its user interface or through the command line to ease the task of automated export/imports. Let’s say you have an external billing service that stores in a remote server all the bills created daily, as a CSV file. With a scheduled job on the server, you can enable Data Loader so that it loads this CSV file into Salesforce automatically (supported for servers running Windows only).
You should use Data Loader when you want to load a standard object that is not supported by the Data Import Wizard, or when you want to schedule a lot of data to be uploaded or an export on a regular basis (using the command line).
You may also need to load around 50,000 to 5,000,000 records (you can use it to load one record; there’s no limitation on the lower end of the scale), but if you need to bulk update more often, you’ll need an external solution, which you can find at AppExchange (http://appexchange.salesforce.com/).
We won’t talk about this tool extensively in this book, so please refer to Salesforce’s official Data Loader guide at https://resources.docs.salesforce.com/218/latest/en-us/sfdc/pdf/salesforce_data_loader.pdf if you wish to find out more. If you want a quick glimpse at what you can do with Data Loader, please refer to this awesome post by Salesforce Ben: https://www.salesforceben.com/introduction-to-the-salesforce-data-loader/.
Exporting data
In the previous section, we saw that we can export data from Salesforce in the following ways:
- Reports: By exporting resulting datasets in CSV (or Excel) format
- Data Loader: By using a SOQL query to get a CSV file that contains the results
You can use other tools or even build your own using the SOAP and REST APIs in order to run SOQL and SOSL queries. You can even use Chrome extensions to do this job on the fly (a full list of Chrome extensions, by Salesforce MVP Jitendra Zaa, can be found at https://www.jitendrazaa.com/blog/salesforce/top-google-chrome-extensions-for-salesforce/).
Salesforce CRM comes with a backup tool that you can leverage to export data from your organization in CSV format, back it up, and so on. This feature is called Data Export and can be found by going to Setup | Data | Data Export.
The tool allows you to do a one-time data export, though it can be scheduled on a weekly or monthly basis, depending on your Salesforce edition (only Enterprise, Performance, and Unlimited deliver the weekly option).
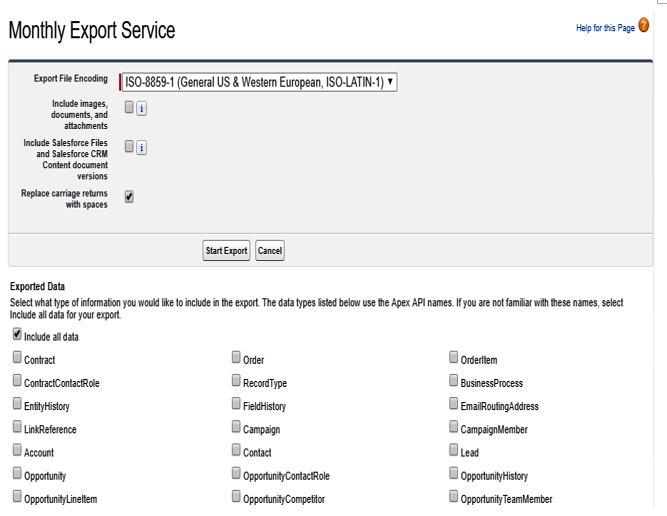
Click on the Export Now button to get to the following page:

From here, do the following:
- Choose file encoding.
- Check the Include images, documents, and attachments and Include Salesforce Files and Salesforce CRM Content document versions checkboxes, which will create bigger files and increase the export time, respectively.
- Check the Replace carriage returns with spaces box if you want to replace carriage returns/line breaks with a single space (this is useful for certain kinds of integration formats).
- Select the kind of data you want to export. By selecting Include all data, you are, as the option suggests, including every Salesforce object.
The kind of objects that are exported depends on the time you create the export job, so if you are creating weekly/monthly export jobs and you create a new object after their creation, remember to update the export job by selecting Include all data.
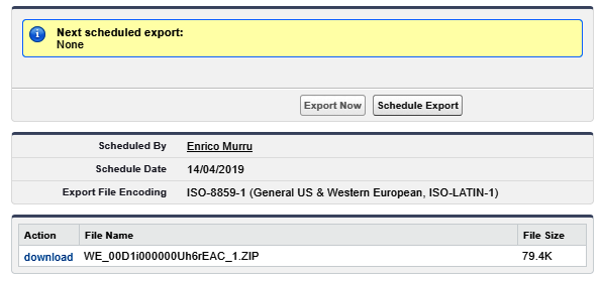
When you hit the Start Export button a job is enqueued and, as usual, Salesforce sends a notification email when the export job has completed:

Scheduled Data Export has a similar configuration, except for the scheduled time frame:

Because jobs are run according to the platform’s load, sometimes, export results won’t appear on the day the scheduled configuration has specified. If this happens, the job will be scheduled 7 or 29 days after the last executed job (7 for a weekly schedule, 29 for a monthly schedule).
The exported data is saved into a ZIP file that contains all the CSV files for the objects that were exported that are up to 512 MB in size. If the data you’ve exported is bigger than this, more ZIP files will be created.
You cannot make subsequent executions of Export Now jobs; you have to wait for the minimum time frame allowed for your organization (7 or 29 days). The exported files are available for 48 hours after their creation, after which the files are automatically deleted.
