Lightning Flows
Lightning flows collect data and perform actions in your Salesforce organization or external system. Their configuration requires point-and click -interactions; no code is required. In this chapter, we will look at screen flows, which collect data from agents or customers (for example, tutorials or wizards), and autolaunched flows, which automatically execute data logic after a record change event (triggered by Process Builder or Apex).
In this chapter, we will cover the following topics:
- How to build a screen flow
- How to build autolaunched flows
- How to manage a flow
- How to debug a flow
- Limits and considerations
Flow concepts
Lightning Flow is one of the most powerful automation frameworks on the Lightning Platform and requires no code. It has countless features and more are added every year. This means that covering every aspect of flows in this chapter is nearly impossible.
That’s why, in this chapter, we’ll cover the basic concepts of flows and their main building blocks: to make you aware of a flow’s power and flexibility. To master flows, you’ll need to practice with them. Dedicated resources regarding flows can be found online and in book shops.
As we’ve already mentioned, with great power comes great responsibility, and flows are no different: if you keep using flows without carefully architecting and designing your processes, you will end up with monster flows, which are hard to maintain and troubleshoot (believe me, this comes from experience).
That’s why, when developers are not skilled at working with flows, I suggest that they build Lightning components and Apex Triggers to the same level of complexity they wanted to reach with Flows. This isn’t because developers cannot learn about flows and master the subject, but because, sometimes, customers don’t even know what they want, and developers quickly find themselves frustrated as they try to adapt a badly architected flow, thus creating a big monster with tens of blocks.
I don’t want to scare you, but before you start building a flow, take your time when designing it and ensure that your business process requirements are completely fulfilled (and documented in every step).
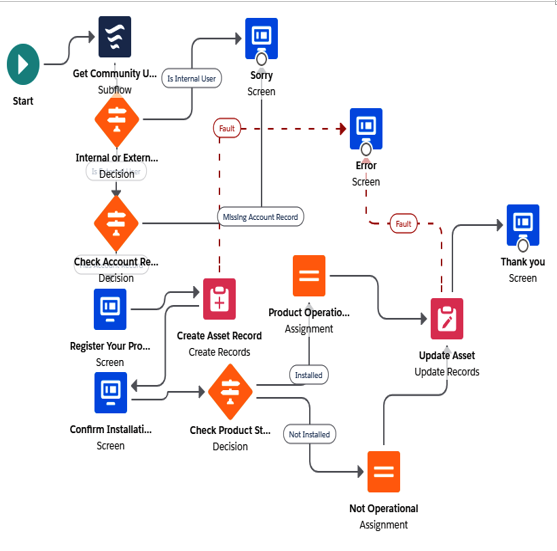
The following diagram is an example of a flow (taken from Salesforce Labs at https://appexchange.salesforce.com/appxListingDetail?listingId=a0N3A00000FAB4hUAH):

Flow example
A flow is composed of the following components:
- Elements: These are the functional actions that a flow can execute, such as exchanging data with a Salesforce database, displaying/gathering information from users, or manipulating data.
- Connectors: These connect elements and thus define the path that the flow will be following.
- Resource: These represent any data references that the flow uses throughout its execution.
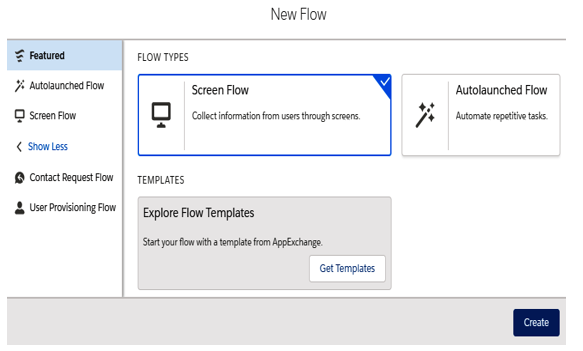
To start creating flows, go to Setup | Process Automation | Flows and click on the New Flow button. You will see the following screen:

The first step of the Flow creation wizard
The first thing we need to select is the kind of flow we are going to build, which will filter out the different kinds of elements and resources that are supported by it:
- Screen flow: This requires user interaction as it’s mainly used to grab data from users (it’s like designing custom wizards using no code)
- Autolaunched flow: This doesn’t require user interaction as it’s mainly used to execute complex process logic (this can be triggered via Process Builder, Apex, or REST APIs)
While there are other kinds of flow types, we’ll be concentrating on the screen flow and autolaunched flow types here as they will cover 90% of your needs. However, if you want to find out more, please refer to Salesforce Help at https://help.salesforce.com/articleView?id=flow_concepts_type.htm&type=5.
