Outbound internet connections
When a public IP address is assigned to a virtual machine’s network interface, outbound traffic to the internet will be routed through that IP address. The recipient will see your public IP address as the source IP address for the connection.
However, the virtual machine itself does not see the public IP address in its network settings—it only sees the private IP address. Traffic leaves the virtual machine via the private IP address, and Source Network Address Translation (SNAT) is used to map the outbound traffic from the private IP address to the public IP address.
Note that, historically, a public IP address is not required for outbound internet traffic. Even without a public IP address assigned, virtual machines can still make outbound internet connections. In this case, SNAT is used to map the private IP address to an internet-facing IP address. However, beginning in September of 2025, default outbound access will be disabled for new virtual networks and will require a NAT Gateway or other outbound appliance.

Create a public IP address using the Azure portal
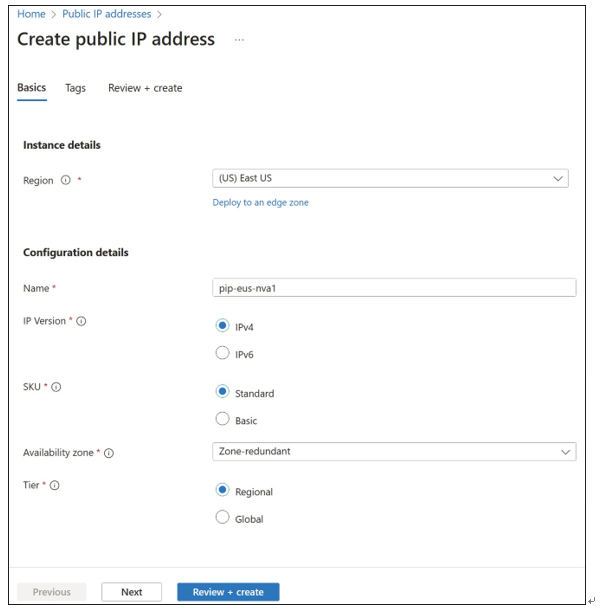
Creating a new public IP address is a simple process using the Azure portal. Search for Public IP addresses, and then click Create. Like all resources in Azure, some details will be required, including the name of the resource, the SKU (or pricing tier), the IP version, idle time-out, subscription, resource group, and location/region. For the Basic SKU, you also specify the IP version and static or dynamic assignment. For the Standard SKU, choose between zone- redundant deployment or a specific availability zone.
The location is critical because an IP address must be in the same location/region as the virtual machine or other resource that will use it. Figure 4-10 shows the Create Public IP Address blade.
Configure user-defined network routes
Network routes control how traffic is routed in your network. Azure provides default routing for common scenarios, with the ability to configure your own network routes where necessary.
System routes
Azure VMs in the same VNet can communicate automatically with each other and with the internet without any explicit configuration changes, even when they are in different subnets. This is also the case for communication from the VMs to your on-premises network when a hybrid connection from Azure to your data center has been established.

FIGURE 4-10 Creating a public IP address in the Azure portal
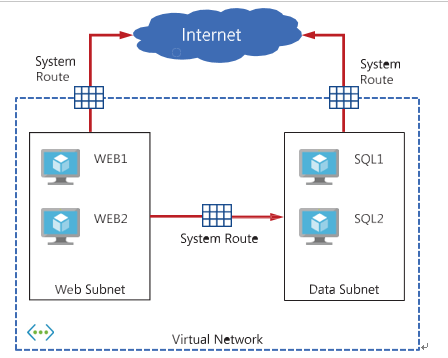
This ease of setup is made possible by what is known as system routes, which define how IP traffic flows in Azure VNets. The following are the default system routes that Azure will use and provide for you:
- Within the same subnet
- From one subnet to another within a VNet
- VMs to the internet
- One VNet to another VNet through a VPN gateway (optional)
- One VNet to another VNet through VNet peering (optional)
- A VNet to your on-premises network through a VPN gateway or ExpressRoute (optional)
- VirtualNetworkServiceEndpoint (optional)
Figure 4-11 shows an example of how these system routes make it easy to get up and running. System routes provide for most typical scenarios by default, without you having to make any routing configuration.

FIGURE 4-11 N-Tier application deployed to Azure VNet using system routes
