Firewall rules can be added to a VPC at any time. The predefined Compute Security Admin role allows you to create, edit, and delete rules. Compute Network Viewer can be used to view rule details. When a new firewall rule is added, you need to give it a name and priority from 0 to 65535. Next, the source and target are defined based on the direction of the flow. Each rule applies to either ingress or egress traffic from the perspective of a target (the instance that receives packets). Also, each rule can either allow or deny access when matched.
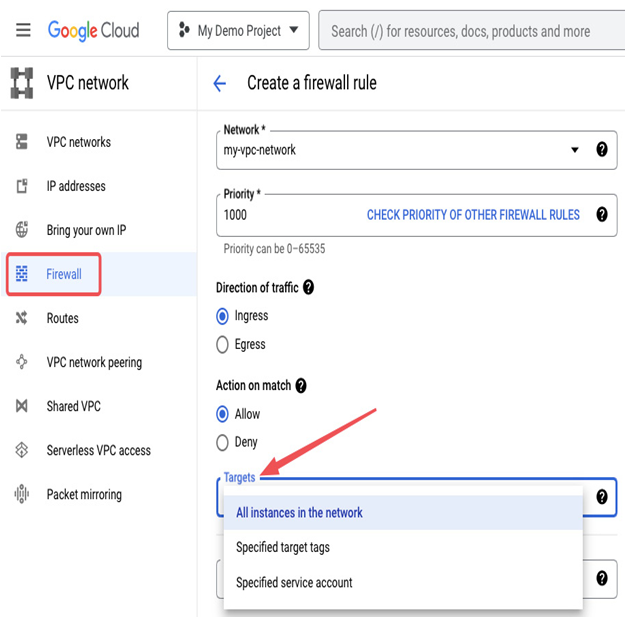
A firewall rule can apply to the following targets:
- All instances in a VPC network: All Compute Engine VMs deployed in a VPC. GKE clusters and App Engine-flexible environments are also considered targets.
- Specified target tag: This allows you to make firewall rules applicable to specific VM instances. Look at Figure 9.5. It shows a list of VMs that have a network tag of global-network. This tag can be used if you want to create a firewall rule that applies to those VMs only.
- Specified service account: The rule applies only to instances with a specified service account.
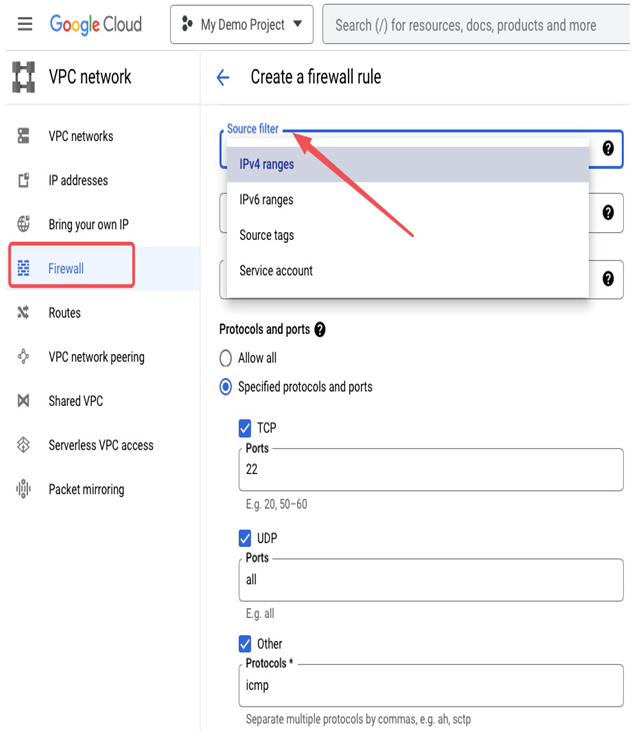
The following source filters can be used for ingress rules:
- An IP address range, such as 0.0.0.0/0, which would mean any IP address.
- A source tag, where you can group VMs from which incoming traffic is either allowed or denied to your target.
- A service account (one or more), so the source would be all VMs with a specified associated service account.
- You can also specify a second source filter to build a more accurate firewall rule. Note that you cannot build a filter by combining source tags and service accounts as first and second source filters.
In the VPC network menu, there is a Firewall section; this is where you can create firewall rules. The following figure shows the available options for rule creation, such as Direction of traffic, Action on match, and Targets. Take a look to see how you can customize your firewall settings:

Figure 9.23 – Selecting a target during firewall rule creation
An IP address range, such as 0.0.0.0/0, which would mean any IP address, can be used as a destination filter for egress traffic.
All traffic rules can apply to the following ports and protocols:
- Allow/Deny all: All ports and protocols are allowed or denied
- TCP: All for all TCP traffic or selected ports, such as 443, or port ranges, such as 20-22
- UDP: All for all UDP traffic or selected ports, such as 53, or port ranges, such as 67-69
- Other: A protocol name, such as icmp or sctp, or a protocol number
Please take a moment to review the following figure, which shows the next step in creating a firewall rule. Here, you can select a source filter and specify the appropriate ports and protocols for your firewall rule:

Figure 9.24 – Building a source filter for an ingress firewall rule
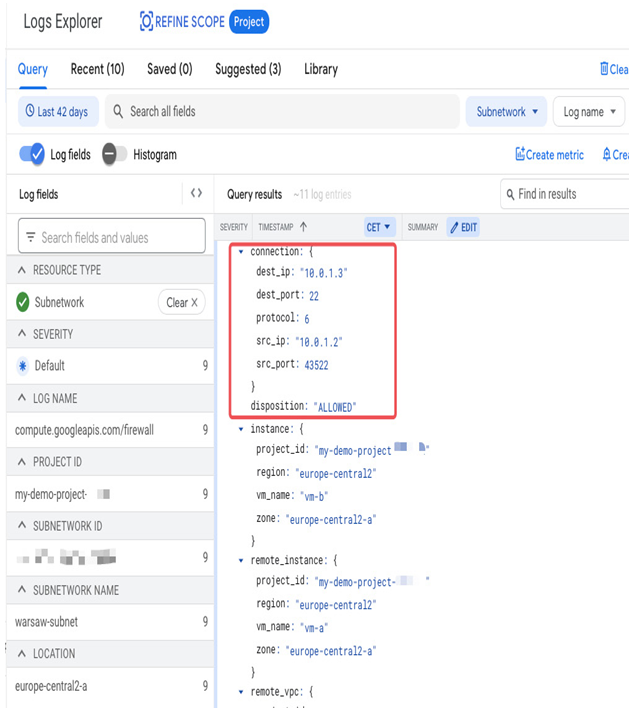
If you need to troubleshoot connectivity issues, you can temporarily disable a suspected firewall rule. Alternatively, you can enable firewall logs on a per-firewall rule basis and monitor the logs in Logs Explorer:

Figure 9.25 – When a rule has firewall logs enabled, it shows the rule hit count
One of the benefits of enabling firewall logs is that you can view the overall hit count, as presented in the preceding screenshot. Also, a hit count time graph is available when viewing firewall rule details. The following screenshot shows how firewall logs can be viewed in Logs Explorer:

Figure 9.26 – Monitoring logs from a firewall rule that allows SSH between VMs in Logs Explorer
Firewall logs can generate large numbers of logs, so they should be enabled with care, such as during troubleshooting or traffic flow analysis.
